Note: This feature is only available on RIM Vaults.
## Creating the Application Chronology Report {#create-report}
After you configure the Application Chronology report type, you can create the report itself:
1. Navigate to the **Reports** tab and click **Create**.
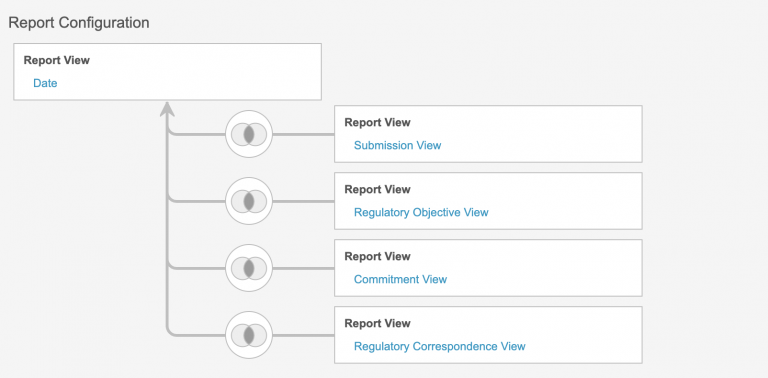
2. In the **Report Type** menu, expand the _Date_ type and select **Application Chronology**.
3. Optional: Enter a **Name** and **Description**.
4. Click **Continue**.
5. Add [prompts, filters, and groupings][11].
6. Configure any [columns][12] you want to display.
When you've finished adding all filters, prompts, groupings, and columns, click **Save** to save the report.
### Adding Prompts, Filters & Groupings {#prompts-filters-groupings}
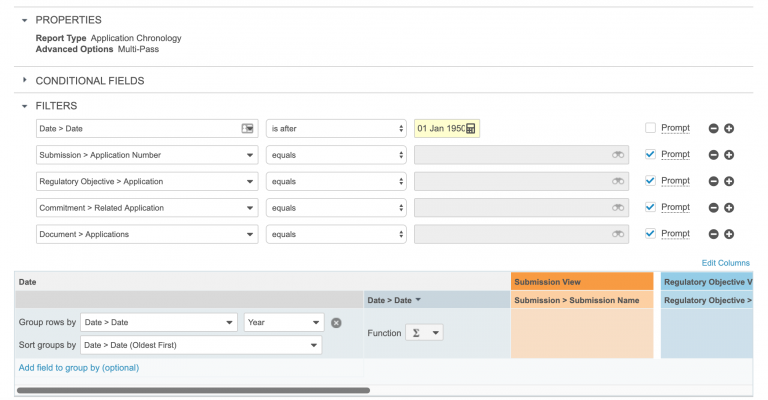
We recommend adding the following filters, prompts, and groupings:
* Add a _Date_ filter: _Date > Date is after "01 Jan 1950"_. The date you select should approximate the oldest date on which your organization has any related documents or records.
* Add the following filters and select the **Prompt** checkbox for each:
* _Submission > Application Number equals_
* Regulatory Objective > Application equals
* Commitment > Related Application equals
* Document > Applications equals
* Add the following grouping:
* In the **Group rows by** drop-down, select _Date > Date_. In the **Select period** drop-down, choose _Year_.
* In the **Sort groups by** drop-down, select _Date > Date (Newest First)_.
* Click the **Date > Date** column header so that the sort arrow is pointing down.
 ### Setting Up Columns {#columns}
Click **Edit Columns** to add the columns you need. We recommend adding the following columns:
* _Date > Date_
* _Submission > Submission Name_
* _Submission > Lifecycle State_
* _Regulatory Objective > Name_
* _Regulatory Objective > Lifecycle State_
* _Commitment > Name_
* _Commitment > Lifecycle State_
* _Document > Document Name_
* _Document > Document Status_
## Configuring the Web Action {#web-action}
After you save your report, we recommend configuring a web action to allow users to launch the report. Configuring a web action will prevent users from needing to fill in repetitive report prompts. Follow the steps in the sections below to configure the web action.
### Running the Report
First, run the Application Chronology report you created:
1. Navigate to the **Reports** table and select _Application Chronology_ report you created.
2. In the **Select Report Values** dialog, complete the report prompts.
3. Click **Continue**.
4. Copy the generated report's URL.
### Creating the Web Action
Next, you can create the web action using the report's URL. Note that you cannot simply copy and paste the URL. You'll need to replace certain elements of the URL with different parameters.
To create the web action:
1. Navigate to **Admin > Configuration > Web Actions** and click **Create**.
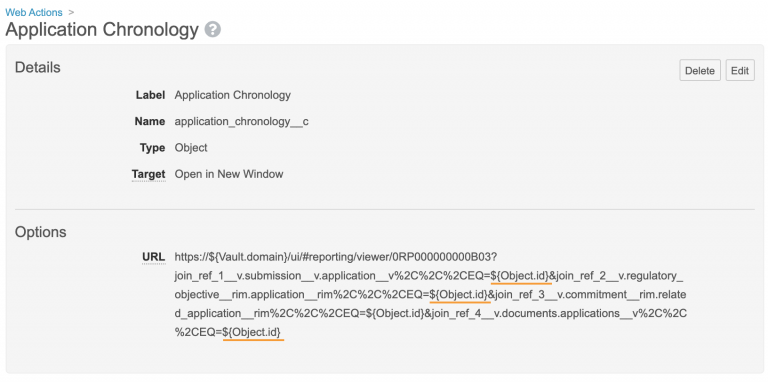
2. Enter a **Label**, for example, _Application Chronology_.
3. In the **Type** drop-down, select **Object**.
4. Select a **Target** from the drop-down. We recommend setting this to _Open in New Window_.
5. In the **URL** box, enter the copied URL.
6. Edit the URL you entered to replace the domain with the `${Vault.domain}` parameter and each of the _00A_ record IDs with the `${Object.id}` parameter.
7. Click **Save**.
### Setting Up Columns {#columns}
Click **Edit Columns** to add the columns you need. We recommend adding the following columns:
* _Date > Date_
* _Submission > Submission Name_
* _Submission > Lifecycle State_
* _Regulatory Objective > Name_
* _Regulatory Objective > Lifecycle State_
* _Commitment > Name_
* _Commitment > Lifecycle State_
* _Document > Document Name_
* _Document > Document Status_
## Configuring the Web Action {#web-action}
After you save your report, we recommend configuring a web action to allow users to launch the report. Configuring a web action will prevent users from needing to fill in repetitive report prompts. Follow the steps in the sections below to configure the web action.
### Running the Report
First, run the Application Chronology report you created:
1. Navigate to the **Reports** table and select _Application Chronology_ report you created.
2. In the **Select Report Values** dialog, complete the report prompts.
3. Click **Continue**.
4. Copy the generated report's URL.
### Creating the Web Action
Next, you can create the web action using the report's URL. Note that you cannot simply copy and paste the URL. You'll need to replace certain elements of the URL with different parameters.
To create the web action:
1. Navigate to **Admin > Configuration > Web Actions** and click **Create**.
2. Enter a **Label**, for example, _Application Chronology_.
3. In the **Type** drop-down, select **Object**.
4. Select a **Target** from the drop-down. We recommend setting this to _Open in New Window_.
5. In the **URL** box, enter the copied URL.
6. Edit the URL you entered to replace the domain with the `${Vault.domain}` parameter and each of the _00A_ record IDs with the `${Object.id}` parameter.
7. Click **Save**.
 ### Configuring the User Action
Finally, you can configure the web action as a user action on the _Application_ object lifecycle. If your Vault doesn't already include an _Application_ lifecycle, you'll need to create one first. We recommend adding this action on the _Active_ state. If needed, you can add additional security on the action to only make it available to certain users.
[2]: #reporting-date
[3]: #report-types
[4]: #report-views
[5]: #multi-pass-type
[6]: #create-report
[7]: #web-action
[11]: #prompts-filters-groupings
[12]: #columns
### Configuring the User Action
Finally, you can configure the web action as a user action on the _Application_ object lifecycle. If your Vault doesn't already include an _Application_ lifecycle, you'll need to create one first. We recommend adding this action on the _Active_ state. If needed, you can add additional security on the action to only make it available to certain users.
[2]: #reporting-date
[3]: #report-types
[4]: #report-views
[5]: #multi-pass-type
[6]: #create-report
[7]: #web-action
[11]: #prompts-filters-groupings
[12]: #columns