# Working with Automated Linking & Link Evaluator

Submissions Publishing offers several methods for efficiently managing hyperlinks within eCTD submissions, for example [Vault Link Annotations to permalinks](/en/lr/486081/). While this method allows for creating link annotations more dynamically, it requires selecting link targets of the same type to existing Vault locations.

With Automated Linking and Link Evaluator, authors can identify links earlier in your organization's document authoring and publishing workstream: While drafting a Microsoft Word document, authors select an area targeting a link that does not yet exist. Once the document is uploaded and the submission is published, publishers can initiate a Content Plan user action to automatically create the links, then verify and resolve any broken links with Link Evaluator.


<div class="note-border alert-info">
  <div class="alert alert-info" role="alert">
    <div><i class="far fa-info-circle"></i></div>
    <div class="alert-text">
      <p><strong>Note</strong>: These features are available in RIM Submissions Publishing Vaults only and must be <a href="/en/lr/554001/">configured by an Admin</a>.</p>
    </div>
  </div>
</div>


## How Vault Generates Automated Links

Automated Linking and Link Evaluator work in tandem to generate and verify links in eCTD submissions: When Automated Linking does not create a link or generates a broken link, Link Evaluator is a visual component available to identify and fix it.

However, your organization can leverage Link Evaluator's capabilities without Automated Linking functionality. When configured, Link Evaluator allows you to view all links in a given Submission, as well as identify broken links within _Content Plan Item_ matched documents. You can also retarget broken links, regardless of the [method](/en/lr/486081/) used to create the link.

### Automated Linking


<div class="note-border alert-info">
  <div class="alert alert-info" role="alert">
    <div><i class="far fa-info-circle"></i></div>
    <div class="alert-text">
      <p><strong>Note</strong>: Only published PDF document renditions are eligible for Automated Linking.</p>
    </div>
  </div>
</div>


Vault relies on both Microsoft Word and Vault components to automatically generate hyperlinks:

* A document author highlights a string of text in their draft document to be linked within Vault, then they run a Microsoft Word <a class="external-link " href="https://support.microsoft.com/en-us/office/create-or-run-a-macro-c6b99036-905c-49a6-818a-dfb98b7c3c9c" target="_blank" rel="noopener">macro<i class="fa fa-external-link" aria-hidden="true"></i></a>. Depending on the macro, the author may be required to manually input some of the information Vault requires to generate the link.
* The macro parses the selected text and saves the link information within the [Veeva Specific URL](/en/lr/554001/#about-the-veeva-specific-url). The Veeva Specific URL acts as an intermediary between a potential link the author indicates in the document, and the actual hyperlink Vault creates within the document.
* Once the macro-enabled document is uploaded, matched, and published, a publisher runs the _Create Automated Links_ action on a _Content Plan_ or _Content Plan Item_ record.
* Vault initiates a job to generate the links. During the job run, Vault reviews the published PDF document renditions matched to the record from which the action was run, as well as those matched to active _Content Plan Item_ records below it. For each PDF rendition containing a Veeva Specific URL, Vault converts it to a link based on a series of Admin-defined rules. Vault applies these rules according to the _Automated Linking Rule Group_ record referenced on the selected _Content Plan Item_ record.
* When the job is complete, Vault sends a notification to the publisher who initiated the action. The notification includes a summary of links processed, successfully resolved, and failed, as well as a link to Link Evaluator.

### Link Evaluator

The _Evaluate Links_ action is available as a user action on _Content Plan_ or _Content Plan Item_ records. Anytime a publisher runs the action, Vault launches Link Evaluator.

Link Evaluator shows the link information for all published PDF renditions matched to the record from which the action was run. When you run the action from a _Content Plan_ record, Vault also displays all active _Content Plan Item_ records with matched documents below it.

Non-PDF documents do not display in Link Evaluator. When the source of an external document hyperlink is a non-PDF document, the linking rules appear as Not Executed. Link Evaluator results are empty for non-PDF files that contain external hyperlinks, as these links can be neither suppressed nor retargeted.

## Authoring Automated Links


<div class="note-border alert-info">
  <div class="alert alert-info" role="alert">
    <div><i class="far fa-info-circle"></i></div>
    <div class="alert-text">
      <p><strong>Note</strong>: To generate links, your draft document must include an appropriately-configured Microsoft Word macro. You can use the <a href="/en/lr/554001/#about-microsoft-word-macros">Veeva-provided macro-enabled template Word document</a>, or your organization may use a custom macro. Contact your organization’s IT personnel or Vault Admin for further installation details.</p>
    </div>
  </div>
</div>


Macro A in the Veeva-provided template includes our recommended best practice, especially for organizations with a strict authoring style that can be replicated with every link. Macro B is a basic alternative for links authored in a unique format which cannot be easily converted with Macro A.

The following steps apply for both macros, except where indicated.

1. Create a draft document with an appropriately-configured Microsoft Word macro.
2. Select the text where a link belongs.
3. Run the macro. Depending on the macro, there may be a hotkey (such as CTRL + Shift + M), or a toolbar button you can use to do so. For Macro A, Word automatically calculates the variables to be inserted into the [Veeva Specific URL](/en/lr/554001/#about-the-veeva-specific-url).
4. Macro B only: In the **Insert Veeva Automated Link** dialog, enter the [Veeva Specific URL](/en/lr/554001/#about-the-veeva-specific-url)'s **Clarifier**, **Target Type**, and **Target Destination**, then click **Save**.
5. Save the Word document and upload or check it into your Vault Library.

Once published, the document is available for automated link generation via the _Content Plan_ or _Content Plan Item_ to which it is matched.

## Generating Automated Links


<div class="note-border alert-info">
  <div class="alert alert-info" role="alert">
    <div><i class="far fa-info-circle"></i></div>
    <div class="alert-text">
      <p><strong>Note</strong>: Only published PDF document renditions are eligible for Automated Linking.</p>
    </div>
  </div>
</div>


To generate automated links in a published PDF document rendition, navigate to a published _Content Plan_ or _Content Plan Item_ record. From the record's actions menu, select **Create Automated Links**.

Vault begins processing the document matched to the record from which the action was run, as well as those matched to active _Content Plan Item_ records below it. When complete, Vault sends a notification including the number of links processed, successfully resolved, and failed, as well as a link to Link Evaluator.

## About Link Evaluator

Link Evaluator is a useful tool for reviewing any links within a published submission, regardless of their current status or type ([Embedded Link, Vault Link Annotation](/en/lr/486081/), Automated Hyperlink). You can also identify and [override][1] broken links, including those generated via Automated Linking.


<div class="note-border alert-info">
  <div class="alert alert-info" role="alert">
    <div><i class="far fa-info-circle"></i></div>
    <div class="alert-text">
      <p><strong>Note</strong>: Link Evaluator supports Content Plans for Modules 1 through 5 only. It does not support Report Level Content Plans, nor any other <em>Content Plan</em> and <em>Content Plan Item</em> object types.</p>
    </div>
  </div>
</div>


### Launching Link Evaluator

When you run the **Evaluate Links** user action from a _Content Plan_ or _Content Plan Item_ record, Vault loads Link Evaluator with link information for the selected _Content Plan Item_, as well as all active _Content Plan Items_ with matched published documents below it. Similarly, when accessed from the Automated Linking notification, Link Evaluator displays the same set of records for which you generated automated links.

### Navigating Link Evaluator

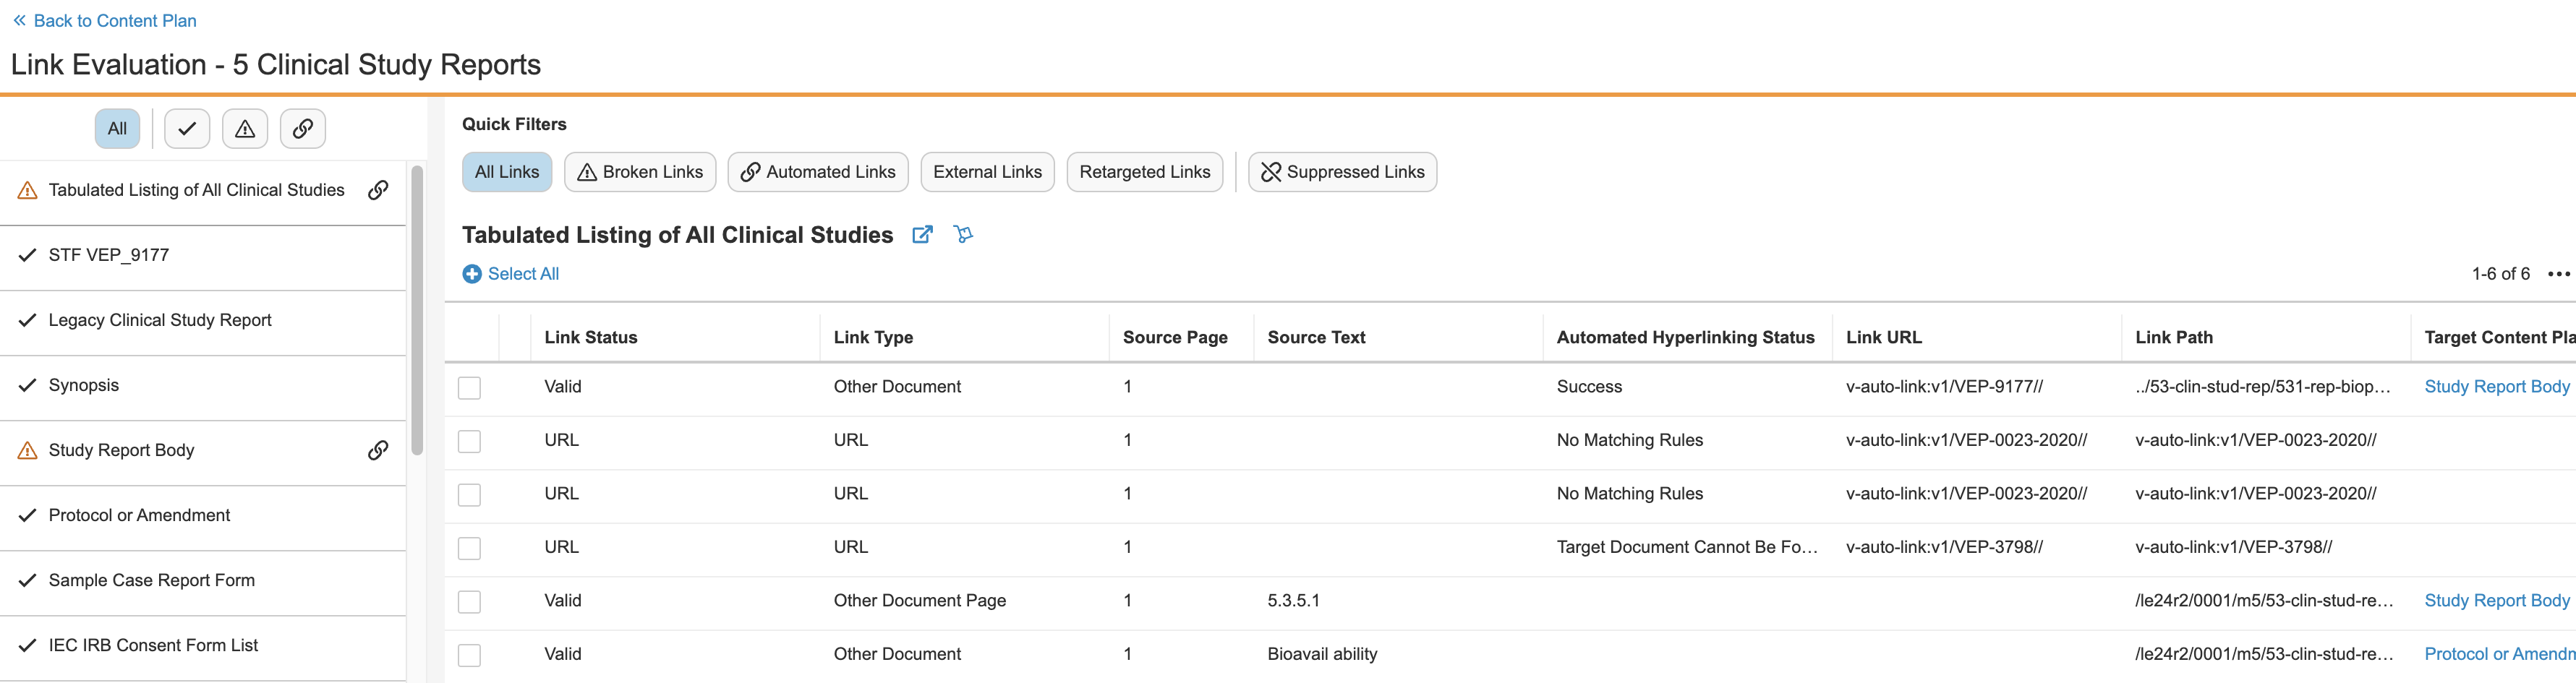
Link Evaluator has two main navigation areas: The navigation pane on the left, and the linking pane on the right.

<a href="https://platform.veevavault.help/assets/images/link-evaluator-full-view-24R1.png" data-lightbox="link evaluator" data-title="" data-alt="link evaluator full view">
  <img class="docimage" src="https://platform.veevavault.help/assets/images/link-evaluator-full-view-24R1.png" alt="link evaluator full view" style="max-width: 100%;width: 400px;"  />
</a>

#### Navigation Pane

The navigation pane lists all items included in the current view, along with an icon or icons for each item's link status:

| Icon | Link Status |
|---|---|
| <i class="far fa-check" style="color: #303030;"></i> | All links are valid. |
| <i class="far fa-exclamation-triangle" style="color: #cc6600;"></i> | Item contains broken links. |
| <i class="far fa-link" style="color: #303030;"></i> | Item contains automated links of any kind. |

Click the corresponding buttons at the top of the panel to navigate among them, or select the **All** button to return to the full list.

#### Linking Pane

When you click on a single _Content Plan Item_ in the navigation pane, the linking pane displays all of the links contained within that item. Vault also shows the selected item's name at the top of the linking pane, with icons to view it in a new browser tab <img class="inline" src="https://platform.veevavault.help/assets/images/link-evaluator-pop-out-icon-23R3.png" alt="link evaluator pop-out icon" style=" max-width: 100%;  width: 400px;" /> or open the Submission in the [Submissions Archive Viewer](/en/lr/450731/) <i class="far fa-dolly" style="color: #0a88c5;"></i>.

To work with specific link types in the linking pane, use the **Quick Filters** at the top to narrow or expand the list. You can select combinations of these buttons to narrow and expand results: for example, selecting **Broken Links** and **Automated Links** together shows links which are both broken and generated via Automated Linking.

The linking pane includes filterable and sortable columns for relevant link metadata, including:
  * **Link Status**, indicating whether a link is valid. This column is static and includes an **Actions** menu to retarget or suppress a link via [override][1]. All other columns can be rearranged via drag and drop.
  * [**Override Level**][2], indicating whether an override was applied at the Submission or Application level. These values are based on the option you select while retargeting or suppressing a link.

## About Link Evaluator Overrides {#about-link-evaluator-overrides}

While reviewing links, you may encounter documents with broken or incorrect links. Link Evaluator’s override capability allows you to address them by [retargeting][6] to a different document or document location, or [suppressing][7] (removing) the link from the published document. You can use the **Retarget Selected Items** option to retarget multiple links at one time. Additionally, you can [revert][8] any misapplied overrides to return a link to its previous state.

When continuous publishing is enabled for the Submission, Vault automatically re-publishes the document each time you apply an override, and the **Link Status** [override indicator icon][3] and hovercard reflect override details. To review override status during and after publishing, refresh the page or re-run the _Evaluate Links_ action.

Overrides are not available for certain documents. See [Override Limitations][4].


<div class="note-border alert-info">
  <div class="alert alert-info" role="alert">
    <div><i class="far fa-info-circle"></i></div>
    <div class="alert-text">
      <p><strong>Note</strong>: After Link Evaluator is enabled in your Vault and before attempting to apply an override, a document must be re-published in order for retargeting to properly function. If you encounter an error, re-publish and re-run the <em>Evaluate Links</em> action.</p>
    </div>
  </div>
</div>


### About Override Levels {#about-override-levels}

When you apply an override, you must also select one of the following override levels:
  * **Current submission** retargets or suppresses a link just for the selected Submission.
  * **All active submissions within current application** retargets or suppresses a link within any active and future Submissions in the Application.

Once processed, Link Evaluator’s **Override Level** column reflects these selections as “Submission” or “Application”, respectively.

Vault also prompts you to select an override level when reverting overrides in bulk. See [Reverting Overrides][8] for more information.

### About Link Status & Override Indicators {#about-link-status--override-indicators}

As you apply and revert overrides, Link Evaluator displays an override indicator icon next to the item’s **Link Status** in the linking pane, indicating the override type and its publishing status.

Hover over each icon to view further override details.

| Icon | Override Indicator |
|---|---|
| <i class="far fa-light fa-bullseye-arrow" style="color: #808080;"></i> | Retargeted link awaiting re-publishing |
| <i class="fal fa-unlink" style="color: #808080;"></i> | Suppressed link awaiting re-publishing |
| <i class="far fa-bullseye-arrow" style="color: #CC6600;"></i> | Reverted override awaiting re-publishing |
| <i class="far fa-bullseye-arrow" style="color: #056BB0;"></i> | Retargeted published link |
| <i class="fal fa-unlink" style="color: #056BB0;"></i> | Suppressed published link |

### How Vault Reverts Overrides {#how-vault-reverts-overrides}

Vault keeps a history of up to two overrides for a given link at a time: The currently-applied override reflected in the **Override Level** column, and the override applied before it (when it is a different level from the current override level).

#### Single Link Revert

When you revert an override for a single link, Vault does not prompt you to select an override level. Instead, Vault references the link’s override history to determine whether to revert only the latest override, or all overrides. The result depends upon the order in which the overrides were applied.

The table below illustrates Vault’s logic when you revert a single override (in-line), and the history includes both Submission and Application.

| Previous Override Level | Current Override Level | Result upon revert (post-publishing) | Reason |
|---|---|---|---|
| Submission | Application | **Reverted**: All overrides <br>**Final result**: Document has original link | Overrides at the Application level impact the current Submission, therefore removing an Application-level override means overrides no longer apply. |
| Application | Submission | **Reverted**: Submission override<br>**Final result**: Link has an Application override | Overrides at the Submission level do not impact the current Application, therefore reverting a Submission-level override has no impact and the Application override still applies. |

#### Bulk Link Revert

When you revert overrides in bulk, Vault reverts the link based on the override level you selected in the **Undo Override** dialog. If the selected level does not exist in the link’s current history, Vault takes no action.

The table below illustrates Vault’s logic when you revert overrides in bulk.

| Previous Override Level | Current Override Level | Selected Override Level during revert | Result upon revert (post-publishing) |
|---|---|---|---|
| Submission | Application | Application | **Reverted**: Application override<br>**Final result**: Document has original link |
| None | Application | Submission | **Reverted**: Nothing<br>**Final result**: Link has an Application override |
| None | Submission | Application | **Reverted**: Nothing<br>**Final result**: Link has a Submission override |
| Application | Submission | Submission | **Reverted**: Submission override<br>**Final result**: Link has a Submission override |

### Override Limitations {#override-limitations}

  * Overrides are supported for custom and viewable renditions only. Vault does not apply overrides to documents matched to a _Content Plan Item_ with its _Source for Published Document_ field set to “Source”.
  * While you can run the _Evaluate Links_ action from a Table of Contents _Content Plan Item_, you cannot apply overrides to links within it. Additionally, any attempts to apply overrides to a Table of Contents do not prompt Vault to republish it.

## Applying & Reverting Overrides {#applying--reverting-overrides}

To address link issues in Link Evaluator, you can:

  * [Retarget][6] links individually
  * [Suppress][7] links individually or in bulk

To undo any of these overrides, you can revert them individually or in bulk. See also How Vault Reverts Overrides for reversion considerations.

### Retargeting Links {#retargeting-links}

To retarget individual links:

1. In the navigation pane, select the item with links to be retargeted.
2. In the linking pane, hover over the **Link Status** column of the link you want to retarget. In the item's **Actions** menu, select **Retarget**.
3. In the **Retarget Link** dialog, select an [override level][2]. When a link has been previously retargeted, **Retarget to different location** is optionally available to select a new document or target upon clicking **Continue**. Otherwise, if this is the first retargeting, you’ll be automatically prompted to select a document or target upon continuing.
4. Click **Continue**.
5. If this is the first time retargeting a link (or if you selected **Retarget to different location** in step 3), Vault displays the **Select Target** dialog. The document list is pre-filtered to include those from the current Application only.
  * To locate the appropriate document for retargeting, you may need to search or apply additional filters.
  * To select the entire document as the new link, click the radio button to the left of the document. To select a specific target in a document, click **+ Select target in this document**. In the new mini-browser window Vault displays with the document's viewable rendition, locate the new permalink and click the green **+** (Create Permalink) icon.
6. Click **Close**.

### Suppressing Links {#suppressing-links}

To suppress individual links:

1. In the navigation pane, select the item with links to be suppressed.
2. In the linking pane, hover over the **Link Status** column of the link you want to suppress. From the **Actions** menu, select **Suppress**.
3. In the dialog, select an [override level][2], then click **Continue**.

You can similarly suppress links in bulk by selecting the checkboxes next to each link you plan to suppress, then selecting **Suppress selected items** from Link Evaluator’s **Actions** menu.


<div class="note-border alert-info">
  <div class="alert alert-info" role="alert">
    <div><i class="far fa-info-circle"></i></div>
    <div class="alert-text">
      <p><strong>Note</strong>: Once a suppressed link is published, the link appears under the <em>Suppressed Links</em> quick filter only, and does not appear under <em>All Links</em>. If a suppressed link is reverted, it is removed from both filters while publishing is ongoing, then placed under <em>All Links</em> once publishing is complete.</p>
    </div>
  </div>
</div>


### Reverting Overrides {#reverting-overrides}

When Vault retargets or suppresses a link, you can undo or revert the override. In most cases, this returns the link to its previous state, before the override was applied. See [How Vault Reverts Overrides][9] for more information.

To revert an individual override:

1. In the navigation pane, select the item with links to be reverted.
2. In the linking pane, hover over the **Link Status** column of the link you want to revert. From the **Actions** menu, select **Undo Last Action**.
3. In the **Undo Override** dialog, confirm the links to be reverted, then click **Continue**.
4. When required, select an [override level][2], then click **Continue**.

You can similarly revert overrides in bulk by selecting the checkboxes next to all links with the same type of override, then selecting the corresponding **Revert** option from Link Evaluator’s **Actions** menu.


[1]: #about-link-evaluator-overrides
[2]: #about-override-levels
[3]: #about-link-status--override-indicators
[4]: #override-limitations
[5]: #applying--reverting-overrides
[6]: #retargeting-links
[7]: #suppressing-links
[8]: #reverting-overrides
[9]: #how-vault-reverts-overrides
