Important: The functionality described on this page is only available to customers who have Vault AI enabled on their Vault.
Agent tools are a capability that provides your Large Language Model (LLM) additional information from your Vault to help it execute an agent action. When executed, agent tools operate as extensions of agent actions, allowing the action to interact with other areas of your Vault to provide relevant information to Vault AI Chat users.
When assigning an agent tool to an agent action, you may include details on when and how to execute the tool in the agent action’s instructions. In addition, you can configure the agent action to always use an assigned agent tool, or let your LLM decide when to employ the agent action. The Description of the agent tool and Input parameters can also help your LLM to understand how to use the agent tool without explicit mention in the instructions.
Note: Ensure that the Description of the agent tool and Input parameters are clear and concise, as your LLM uses this information to understand the purpose of and how to execute the agent tool. If the Description is easy to understand, your LLM can invoke the agent tool without explicit direction in the agent action instructions.
VQL Query Agent Tool
The VQL Query agent tool allows an agent action to query Vault for specific data. For example, VernBio has created a custom Document Quality Check agent action that checks document spelling and grammar. Also, they would like the agent action to check if company terms and acronyms used in documents exist in VernBio’s glossary. To accomplish this behavior, they created an agent tool using the VQL Query Tool Type, which allows the agent action to query the VernBio Glossary object for accepted terms and phrases. Now, when a user clicks Document Quality Check, it will not only provide spelling and grammar checks, but also check if company terms used in the document are available in the glossary.
How to Configure a VQL Query Agent Tool
To configure a VQL Query agent tool:
- Navigate to Admin > Configuration > Tools.
- Click Create.
- Select VQL Query as the Tool Type.
- Enter a Label. The API Name field value is populated based on the Label value.
- Set the Status to Active or Inactive. By default, new agent tools are created in the Active status.
- Enter a Description.
- Under Input, click Add. This option is not available until you select the Tool Type.
- Enter a Property. This value represents the attribute your LLM uses to execute the Agent Tool. For example, if you enter
SELECT id, name__v FROM documents WHERE TONAME(type__v) = 'promotional_piece__c'in the Query field, you would enterpromotional_piece__cas the Property. - Select String, Integer, or Number from the Type drop-down.
- Enter a Description of the Input parameter.
- Click Add.
- Enter your VQL statement in the Query field.
- Click Save.
The VQL Query agent tool is now created and you can assign it to an agent action.
Best Practices
Use the following best practices when configuring agent tools:
- Reference Input parameters in the Query field using the
${parameter_name}format. Parameter names are case sensitive and must match the Property. For example, if you enterSELECT id, name__v FROM documents WHERE TONAME(type__v) = ${promotional_piece__c}in the Query field, you must enter${promotional_piece__c}as the Property. - Always include an
ORDER BYclause when using a query that returns multiple records to ensure the LLM receives the most relevant data first within the 1,000 record limit. - Your LLM uses the agent tool Description to interpret and execute the agent tool within agent actions. Ensure the Description is accurate and easy to understand to help the LLM when executing the agent tool.
- Use the
ASclause to provide meaningful Name values to fields and help the LLM accurately interpret the data. For example:status__v AS current_approval_status. - Use the developer portal to learn more about VQL syntax.
Limits
The following limits apply to configuring agent tools:
- The VQL Query agent tool does not support
LIMIT,PAGESIZE, orPAGEOFFSETVQL query clauses. - The VQL Query agent tool only supports object and document query targets.
- You can add up to ten Input parameters per agent tool.
- VQL Query agent tools can return a maximum of 1,000 records. If the query returns over 1,000 records, only the first 1,000 are sent to the LLM. Subquery limits are determined by your Vault’s
MAXROWSconfiguration. - The characters “ ‘ () and \ are escaped if used in Property values. The % and * characters are not escaped when used in
LIKEandFINDoperators. - The Property field does not support lists and enumerations.
- When using multiple arguments in a
CONTAINSoperator, you must provide multiple individual tokens. For example:WHERE CONTAINS(${PROD_1}, ${PROD_2}). - You must use search phrases in
FINDVQL clauses as tokens. For example:FIND( ${search_statement} )is valid whileFIND( ${prod_1} AND ${prod_2})is invalid.
JSON Response Agent Tool
The JSON Response agent tool allows you to generate JSON structured data based on input schema. You can execute a custom agent action using a JSON Response agent tool through either Vault Java SDK or Vault API to generate JSON formatted data. External programs, such as Java, can consume the data for processing purposes.
Important: When crafting a Description for the JSON Response, do not use language that suggests the agent tool outputs a JSON result. This language may cause errors when the agent action invokes the agent tool. Instead, the Description should mention the LLM provides the JSON response. For example, “Generate a JSON output based on the document” may return an error, while “Report the detected language, summary, and keywords for a given document based on its content” is a valid Description.
The JSON Response schema supports the following:
- Up to five levels of nesting
- 100 properties per JSON Response agent tool
- Required parameters
- Types:
- Object
- Array
- String
- Number
- Integer
- Date
- Enum data type
The following is an example of the JSON input schema you can use in the JSON Response:
{
  "type": "object",
  "properties": {
    "document_id": {
      "type": "string",
      "description": "The document identifier, echoed from input."
    },
    "language": {
      "type": "string",
      "description": "Detected language of the document as an ISO 639-1 two-letter code (example: 'en', 'fr', 'de')."
    },
    "summary": {
      "type": "string",
      "description": "A concise summary of the document content, between two and five sentences."
    },
    "keywords": {
      "type": "string",
      "description": "Up to ten representative keywords extracted from the document and returned as a single comma-separated string (example: 'biology, syllabus, course, grading, schedule')."
    }
  },
  "required": ["document_id", "language", "summary", "keywords"]
}
How to Configure a JSON Response Agent Tool
To configure a JSON Response agent tool:
- Navigate to Admin > Configuration > Tools.
- Click Create.
- Select JSON Response as the Tool Type.
- Enter a Label. The API Name field value is populated based on the Label value.
- Set the Status to Active or Inactive. By default, new agent tools are created in the Active status.
- Enter a Description.
- Under Input, enter the structured JSON input schema in the JSON Response field.
- Click Save.
The JSON Response agent tool is now created and you can assign it to an agent action.
Single Item Workflow Task Completion Agent Tool
The Single Item Workflow Task Completion agent tool allows you to create an agent action that can perform and complete document and object record workflow tasks. You can only assign this agent tool to an agent action as it is system-managed. It is recommended to use this agent tool to complete high volume workflow tasks with low complexity, such as those with simple tasks.
To ensure an agent action can complete a workflow task with Single Item Workflow Task Completion, complete the following configurations:
-
Create an object or document agent using an object record or document currently in a workflow. Only single record and single document workflows are supported.
- Create an agent action for completing a workflow task.
- Ensure the agent action’s Label, Name, and Description clearly state the purpose is to only complete assigned workflow tasks. For best results, the agent action Label should match as closely as possible to the task Label it is intended to complete. For example, Work Order Request Workflow: Agent Review Task is a valid name for an agent action that completes review tasks in a Work Order Request record workflow.
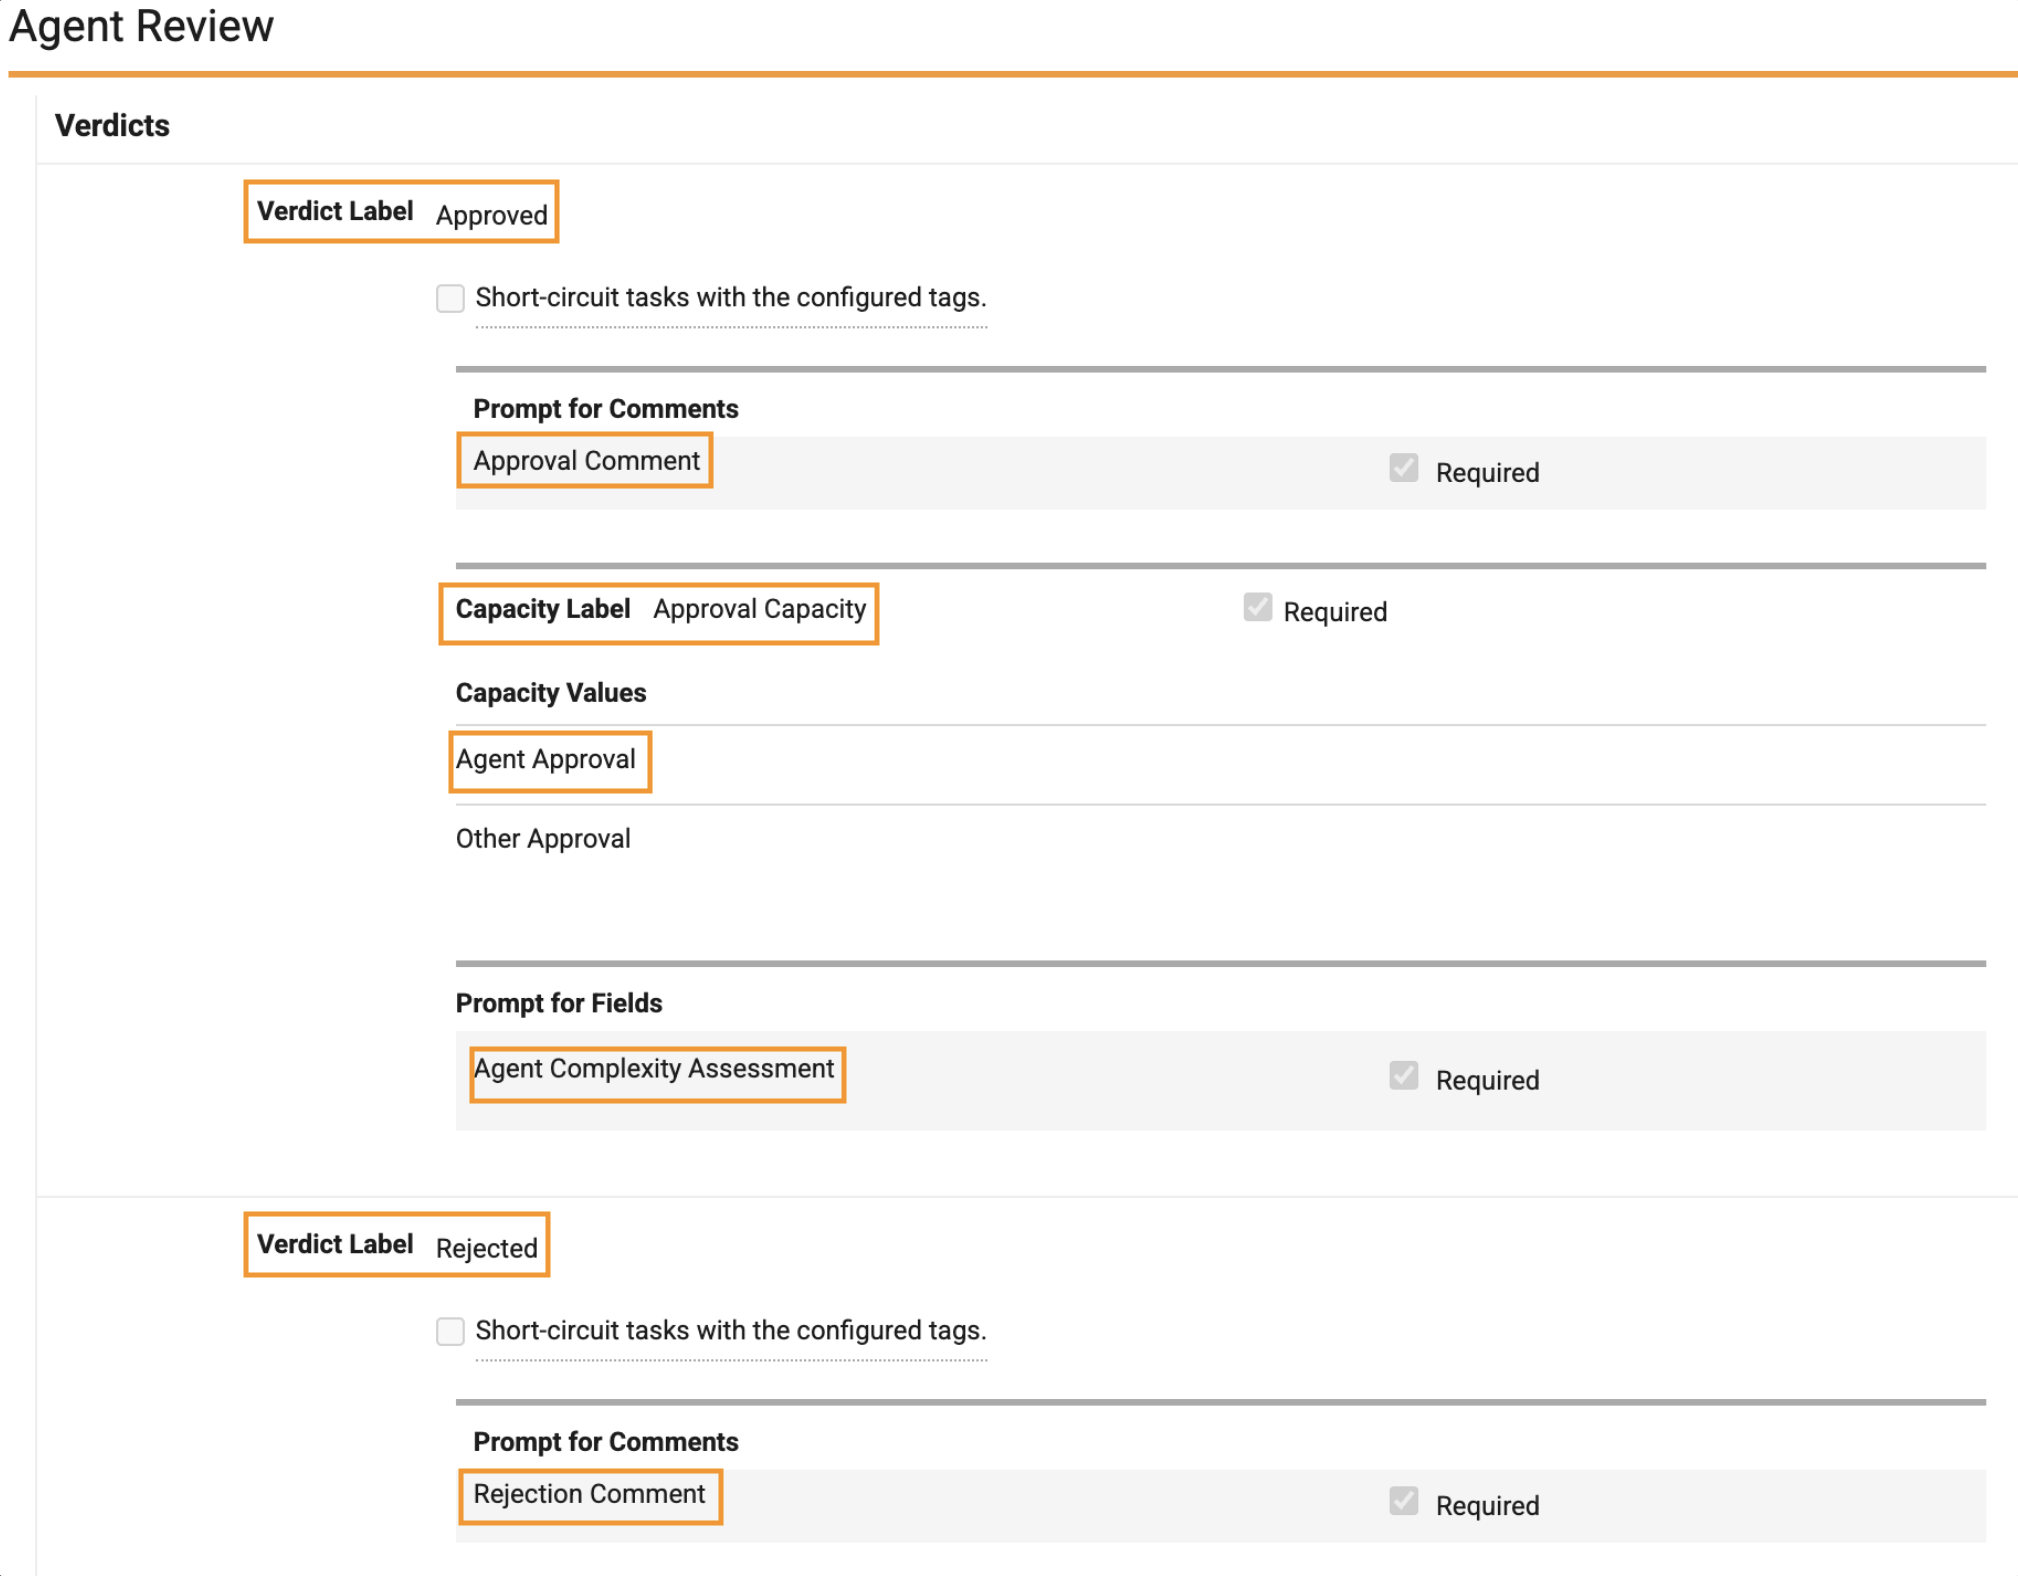
- Ensure the agent action’s Instructions define how to complete the task, and rules for success and failure. For example, if the workflow prompts for Approved and Rejected verdicts, describe the conditions that can lead to each verdict. Reference prompt for verdict Label values in the Instructions just as they appear in the Vault UI in the agent user’s base language. This process is similar to creating a Standard Operating Procedure for a user. See an example below.
- Assign the Single Item Workflow Task Completion agent tool to the agent action.
The agent action is now configured to complete a workflow task. Users can now add the agent user as a participant to the workflow and assign them tasks. It is recommended to first test your configuration in a sandbox environment. It is also recommended to create one agent action per workflow tasks. It is not recommended for multiple agent actions to complete the same workflow task.
Referencing Prompts Labels in Instructions
If a task prompts for comments or prompts for verdicts, capacities, or fields, it’s important to use the Label values as they appear in the Task step configuration when configuring the agent action Instructions. Doing so allows the agent action to pass these required fields to the agent tool for processing. For example, if a Capacity Value is labeled Agent Approval, you must use this same label when referencing this field in the Instructions. Otherwise, the agent action may fail to accurately interpret the prompt.
See below an example of the agent action Instructions. In this example, the Instructions reference the Approved and Rejected verdicts, the Rejection Comment, Approval Comment, Approval Capacity, Agent Approval, and Agent Complexity Assessment prompts:
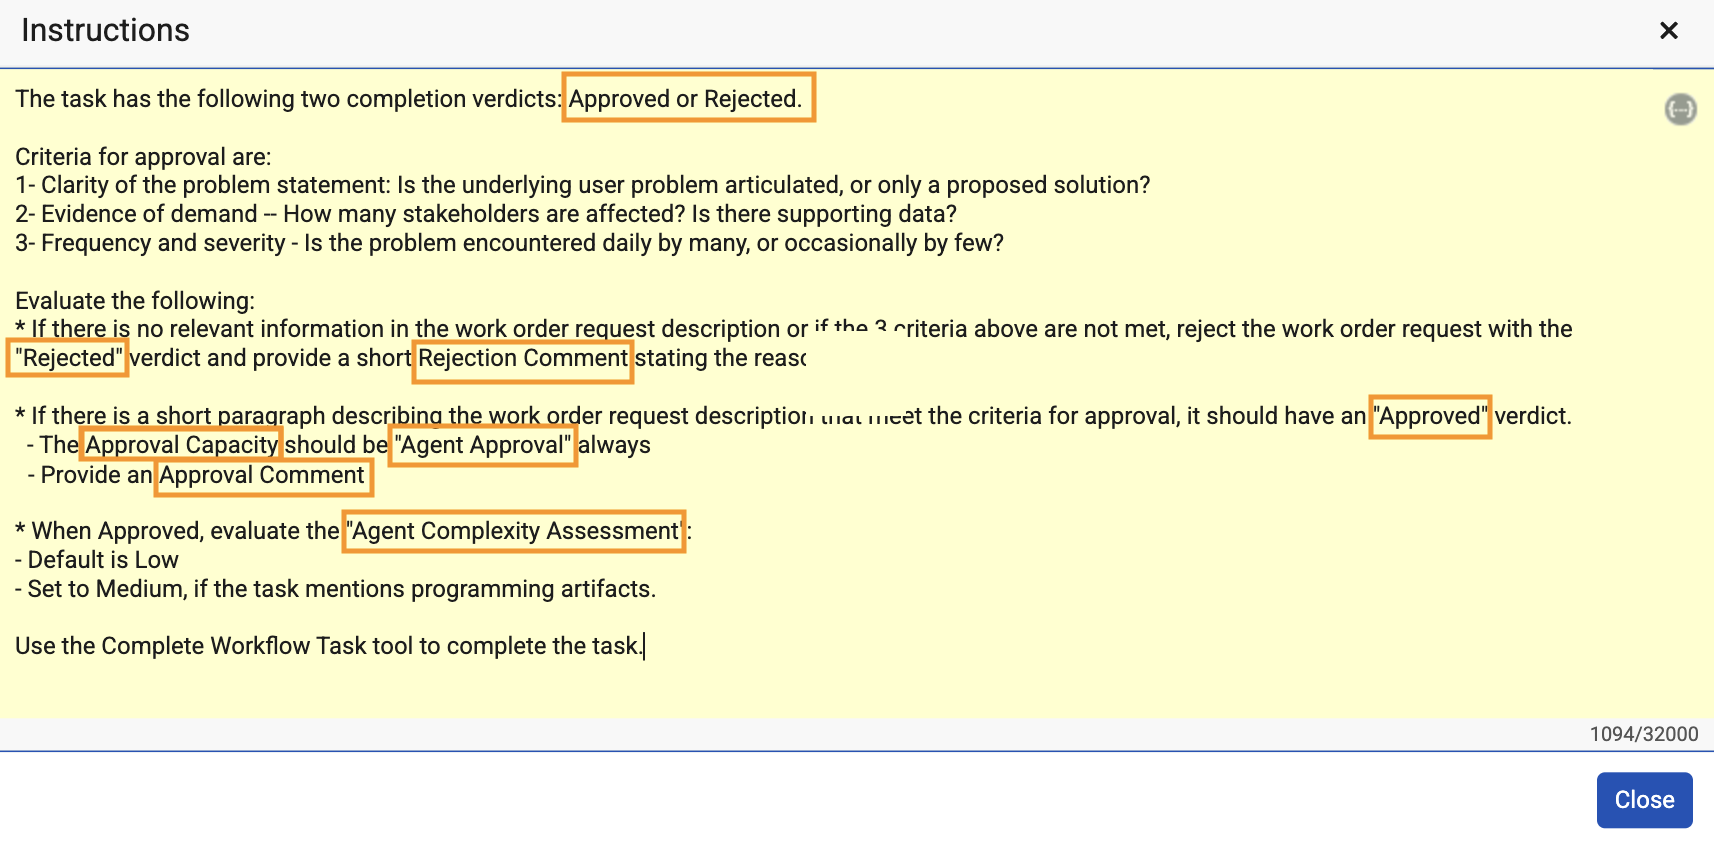
The labels are displayed in the agent action Instructions exactly as they are displayed in the Task step configuration.
Task Completion
Once a task is assigned to an agent user, the Agent Workflow Task Execution job sends the task ID and agent user ID to the Super Agent’s Workflow Task Execution agent action. Then, Workflow Task Execution routes to and executes the appropriate agent action you created to complete the workflow task. The Agent Workflow Task Execution job runs on an hourly basis by default to locate tasks assigned to agent users in your Vault. Only one task ID is sent to the Workflow Task Execution agent action per task and task iteration.
You must manually run the Agent Workflow Task Execution job when testing your configuration to avoid the hour wait time.
Task Priority
Tasks are completed by agent users in order of task due date in ascending order. For example, if the current day is Monday, a task with a due date of Tuesday is processed before a task with a due date of Wednesday. Tasks with null/blank due dates are processed after all other tasks with due dates have been processed.
Test Your Configuration
Follow the steps below to test the agent action and agent tool configuration in a sandbox environment:
- Configure or use an existing single document or object workflow for testing purposes. Ensure the workflow tasks are not complex (for example, tasks with few verdicts or prompts).
- Complete the steps above. Ensure Support in Chat is set to Yes in the agent action configuration.
- Add agent context to the agent action that describes the context needed to complete the task.
- Select the agent action in Vault AI Chat while viewing the document or record that is currently in the workflow. If the agent action Instructions and agent context are valid, the agent action responds with the data that leads to task completion. For example, if the task’s verdicts include Approved and Rejected, the response includes the task verdict and the conditions that led to the verdict, based on your Instructions configuration.
- Initiate an agent trace session for the agent user that completes workflow tasks. You can inspect the trace details file for information on errors that may occur during the testing process and the agent action’s execution of the task.
- Start the workflow and ensure the agent user is assigned to the task based on the task participant selection configuration (alternatively, agent users can be assigned to the Participant group downstream in the workflow).
- Once the agent user is assigned to the task, run the Agent Workflow Task Execution job in the Job Status page.
- If your configuration is valid, the agent user completes the workflow task. You can view the completion details in the agent trace session logs. Vault sends you an error notification if the agent user fails to complete the task.
Note: Single Item Workflow Task Completion does not support completing eSignature or participant selection tasks. In addition, you can only assign tasks to agent users as making tasks available to agent users is not supported.
Error Handling
In the event an agent user fails to complete a task due to an error, an Agent Assignment Error notification is sent to the workflow owner with the reason for the failure. If the workflow was system initiated, the notification is sent to the system provided Vault Owner group. The workflow owner can then cancel the task or reassign it to another user or agent user. If no action is taken, the task remains assigned to the agent user.
If the workflow is reopened, a new iteration of the task is assigned to the agent user. Up to ten task iterations are allowed. If the Single Item Workflow Task Completion agent tool runs into an error, the agent action can retry the agent tool up to three times.
Limits
- Only task assignment to agent users is supported and not making tasks available.
- Agent users cannot complete eSignature tasks.
- Agent users cannot assign users to Partcipant groups.
- Object reference fields values are supported with Prompt for Fields if Values must be unique is enabled on the Name (
name__v) field on the referenced object record is unique. This ensures that when the agent passes the Label value to the LLM that the referenced object record value is uniquely identified. - Only single document and single object record workflows are supported.