
 |_Content Plan Item_ record; Vault automatically updates this icon based on the record's completeness|
|
|_Content Plan Item_ record; Vault automatically updates this icon based on the record's completeness|
| |Matched document; Vault displays the icon corresponding to the document's file format, e.g., Microsoft Word|
|
|Matched document; Vault displays the icon corresponding to the document's file format, e.g., Microsoft Word|
|
 |Inactive _Content Plan_ record, collapsed or open in the viewer|
||Inactive _Content Plan Item_ record|
|
|Inactive _Content Plan_ record, collapsed or open in the viewer|
||Inactive _Content Plan Item_ record|
| |Document matched to inactive Content Plan Item record; Vault displays the icon corresponding to the document's file format, e.g., Microsoft Word|
See details below about [working with _Inactive_ records in the Hierarchy Viewer][5].
### Breadcrumbs {#breadcrumbs}
When you open the viewer, the breadcrumb trail at the top of the screen reflects the _Application_ and _Submission_ records, _Event_ record, or _Report Level Content Plan_ record, depending on the content plan type. If you didn't open the content plan from its root, the breadcrumb trail and viewer title also include the root _Content Plan_ record. Clicking a link in the breadcrumb trail navigates you directly to that record.
When you click a Content Plan record's name in the grid, Vault shows that record as the root and updates the breadcrumb trail to reflect your selection. Clicking a link to a content plan section or content plan item in the breadcrumb trail refreshes the grid to display that section.
### Status Icon {#status-icon}
A status icon above the grid indicates any current jobs that are queued or processing in the background. A green checkmark icon () indicates that Vault is not currently running an operation. A yellow clock icon () indicates that Vault is processing an operation. Hover over the icon to see which operation is currently processing, or click the icon to refresh the status.
Actions which trigger the icon to change include:
* _Copy into Content Plan_ when the current _Content Plan_ is the source
* _Copy into Content Plan_ when the current _Content Plan_ is the target
* _Split Content Plan Item_
* _Update Content Plan_
* Asynchronous state changes via the _Content Plan Hierarchy State Change_ action
## Customizing the Hierarchy Viewer Grid
The Content Plan Hierarchy Viewer offers options for customizing the grid appearance:
### Resizing Columns
Resize the width of each column by dragging the edges of the column heading. An orange dotted line appears while you drag. You can't resize row height manually, as Vault automatically adjusts row height to fit the cell text.
### Rearranging Columns
Change the order of columns for each object by clicking and dragging the column header to a new location in that object's column group. A blue dotted line appears to highlight the new location while you drag. You cannot move the **Name** column.
### Adding or Removing Columns
To add or remove columns, select **Edit Columns** from the main **Actions** menu. Vault opens a dialog of fields sorted by object and matched document. From the dialog box, you can move fields between the _Available Columns_ box and the _Selected Columns_ box. In the _Selected Columns_ box, rearrange the column order using the **Up** and **Down** arrow buttons. To reset all settings to default, click **Restore**.
You cannot remove or rearrange the **Name** column. To improve performance, we recommend adding no more than 16 columns, including the **Name** column.
### Customizing Column Text Appearance
Sometimes text is too long to fit properly inside its column. In the main **Actions** menu, the **Truncate Cell Text** and **Wrap Cell Text** options let you toggle between truncating and wrapping cell text.
## Filtering the Hierarchy Viewer Grid {#filters}
Some columns in the grid include a **Filter** () icon. When this icon is available, you can apply a filter on that content plan, content plan item, or matched document field. Vault applies your filters to the entire content plan.
### Filtering Options
You can use the one-click filter chip buttons in the top left of the screen to customize the view.
* **Show Active/Inactive** toggles between showing and hiding inactive records.
* **Show Favorites Only** narrows down to selected (starred) Content Plan and Content Plan Item records within the context of the same Root Content Plan.
* **Show/Hide Content Plan Items** provides a read-only view of the Content Plan sections and Matched Documents only. When Content Plan Items are hidden, no actions may be taken on the documents or visible Content Plan records. A popup banner alerts users that no actions may be taken while in this viewing mode.
### Applying Filters
To apply a filter, click the **Filter** icon, select or enter a filter value, and click **Apply**. You can only filter on one object at a time. For example, if you've applied filters to a content plan item field, you can apply filters to other content plan item fields, but you can't apply filters on any content plan or matched document fields. You can only filter on one text field at a time, including _Name_.
Applied filters appear under the _Filters_ section above the grid. You can click the **caret** icon next to _Filters_ to hide or view your applied filters. All filtered results appear in the grid until you refresh the page, even if you update values so that they no longer meet filter criteria or so that additional items meet filter criteria.
### Available Filters
You can filter on any Text, Number, Date, Picklist, Object, Lifecycle State, and Yes/No content plan, content plan item, and standard fields. When filtering on Picklist, Object, or Lifecycle State fields, you can only select values that are associated with records in the content plan.
You can also filter on the _Version is Locked_, _Is Latest Version_, _Lifecycle State_, and _Ready for Publishing_ matched document fields, in addition to _Type_ and _Name_.
#### Filtering by Type {#filter-by-type}
When you filter by _Type_, Vault only displays standard columns and columns for the selected type, and results don't appear in a hierarchical structure. The _Type_ filter is available for content plans, content plan items, and matched documents.
#### Filtering by Name
When you filter on the _Name_ column, Vault includes both content plan and content plan items in results. You can't apply filters to other text fields when you filter by _Name_.
### Filtering by Current User
When you filter a column referencing the _User_ object (_Created By_, _Last Modified By_, etc.), Vault includes _Current User_ at the top of the filter list. Selecting _Current User_ filters results based upon the logged-in User applying the filter, allowing for more dynamic filtering, which is especially useful for creating and sharing Saved Views.
### About the Filter Icon
The **Filter** icon appears differently depending on what filters you've already applied:
|Icon|Status|
|--- |--- |
||Column available to filter|
||Filter applied|
||Column not available based on applied filters|
### Removing Filters
To remove filters, you can click the **X** button to clear individual filters or **Clear All Filters** at once. If you view another record as root after you apply filters, Vault automatically clears filters when the screen refreshes. You can use the breadcrumb trail or click your browser's **Back** button to return to your filtered view. If you open a record's details page to view or edit it, Vault reapplies your filters when you return to the viewer.
## Using Saved Views {#views}
Views allow you to save or "bookmark" your current columns, filters, and grid settings and return to this view with a single click. The Using Saved Views in RIM article discusses using views in the Content Plan Hierarchy Viewer, although much of the functionality is similar to custom views in the Library.
In order to use views in the Content Plan Hierarchy Viewer, either the _Submission_ or the _Report Level Content Plan_ field must be populated on the root _Content Plan_ record. Views are specific to submission content plans or report level content plans. For example, if you are working in a submission content plan, you can only select submission content plan views and not report level content plan views.
## Working in the Hierarchy Viewer Grid
This section discusses options for working with records in the grid.
### Inline Editing
You can inline edit object record fields in the grid. You cannot use inline editing on Matched Document fields in the grid.
### Creating Records {#creating-records}
Within a content plan section, you can create sibling _Content Plan_ and _Content Plan Item_ records:
1. From a record's grid item **Actions** menu, select **Create Sibling** or **Create Child**.
2. Choose the object for which you want to create records and the object type, if available. Vault may automatically select an object and type and progress you to the record creation dialog depending on your permissions.
3. In the dialog, fill in the record fields. Vault automatically populates the _Content Plan_, _Application_, _Primary Application_, _Submission_, _Primary Submission_, _Related Grouped Submission_, _Report Level Content Plan_, certain _Submission_ joins or _Report Level Content Plan_ joins, and certain matching fields based on the record from which you started the action. You can select different values in most of these fields, if desired.
4. Click **Save** to create the record, or **Save + Create** to create additional records. Each time you save a record, Vault creates it immediately, and it appears inline in the viewer.
You cannot create child records from _Inactive_ records or sibling records from the root _Content Plan_ record. These actions are not available if any filters except **View as Root** are applied.
### Viewing as Root {#view-as-root}
When you **View As Root**, Vault updates the [breadcrumb trail][14] and lists your selection under **Filters**, along with any other filters you've already applied. You can use the breadcrumb trail to navigate the content plan tree structure. You can also click the **X** button next to the _View As Root_ filter or select **Clear All Filters** to return to the original view.
You can initiate the **View As Root** action to display a record as the root level in the grid. You can view a record as the root in one of two ways:
* Click the record's name
* Click the **View As Root** icon () next to the record's name; this option is only available when a content plan section has more than 2,000 descendants
### Expanding Sections
You can expand a content plan section to see all its descendant content plans and content plan items at once. From a _Content Plan_ record's grid item **Actions** menu, select **Expand**. Vault displays all content plans and content plan items in the section, but not matched documents.
You won't see this action if the content plan section has no descendants or has the **[View As Root][3]** icon. If the content plan section has more than 2,000 descendants, expanding the section will only load up to 2,000 records. You'll need to **View as Root** to see the remaining descendants.
### Collapsing Sections
To collapse a content plan section, open the _Content Plan_ record's grid item **Actions** menu and click **Collapse**. Vault automatically collapses any expanded descendant content plan, content plan item, and matched document rows in that section.
### Using Bulk Actions
You can use bulk object record actions in the grid to edit and delete records. To perform a bulk action, you must first [filter by _Type_][16].
After selecting an object in the _Type_ filter, you can initiate the bulk action from the **[main Actions menu][17]**. Vault only applies the bulk action to the filtered results in your current view.
### Reordering {#reordering}
You can reorder _Content Plans_ and _Content Plan Item_ records using drag and drop or by selecting a reposition action from the _Actions_ menu for the record you want to move.
To reorder _Content Plans_ and _Content Plan Items_ using drag and drop, drag the record and drop it on its target location among its siblings within the same parent _Content Plan_ record. When dropped on the target location, Vault moves the record and all of its child nodes (_Content Plans_, _Content Plan Items_, and matched documents) to the new location.
To reorder _Content Plans_ and _Content Plan Items_ using the _Actions_ menu:
1. Open your _Content Plan_ in the viewer and remove any applied filters.
2. Open the grid item **Actions** menu for the record you want to move.
3. Select an action under **Reposition**, for example **Move to Bottom** to reposition as the last item in the list. If you select **Set Exact Position**, the **Set Position of Record Within List** dialog opens. Enter a position for your record. The position is a number representing the place in the order of all records in the list. For example, entering _3_ places the record third in the list.
4. Click **OK**. Vault reorders the object records.
### Opening the Submissions Archive Viewer (RIM Submissions Archive)
When the content plan's corresponding _Submission_ record has been published or imported, you can click the **Open Submissions Archive Viewer** icon to open the **Viewer** tab filtered to the correct _Application_ and _Submission_.
### Opening the Submission Ready Binder (RIM Submissions)
You can click the **View Submission Ready Binder** icon to open a _Submission Ready_ binder directly from the Hierarchy Viewer. You'll only see this button for published content plans that reference the _Submission Ready_ binder.
### Generating Automated Links (RIM Submissions Publishing)
When Automated Linking is configured, the **Create Automated Links** action is available for individual records and allows publishers to generate hyperlinks.
### Evaluating Links (RIM Submissions Publishing)
When Link Evaluator is configured, the **Evaluate Links** action is available for individual records and allows users to view all links in a given Submission, as well as identify and retarget broken links within _Content Plan Item_ matched documents.
## Copying Into Content Plan Sections {#copy-section}
In the Content Plan Hierarchy Viewer, you can drag and drop to copy a content plan section or item from a source content plan to the desired location in the target content plan. Copying a content plan section or item allows you to reuse existing content and prevent duplicate work. When you copy a content plan section, Vault includes the source _Content Plan_ or _Content Plan Item_ records and join records. You can also choose to copy matched documents and preserve version locking. See Copying Into Content Plans for more information.
## Working with Matched Documents
This section discusses working with matched documents in the grid.
### Matched Document Actions {#matched-document-actions}
There are several actions available from a matched document's **Actions** menu in the grid:
* **Lock Version**: Lock the content plan item to a specific document version
* **Unlock Version**: Unlock a matched document version from the content plan item
* **Exclude Document**/**Remove Document**: Unmatch a document from a content plan item
These actions are not available on documents matched to inactive _Content Plan Item_ records.
### Match Document Mode {#match-document-mode}
**Match Document Mode** facilitates the process of manually matching documents within the Content Plan Viewer with a pre-filtered document picker that makes it easy to search for and match documents without having to navigate away from the Content Plan Viewer to match. You can launch Match Document Mode to manually match documents within the Content Plan Viewer from the grid's **Actions** menu or from the Content Plan Item action menu when the **Match Document Mode** object action is active and configured.
#### Match Document Mode Content Plan Viewer Tree
In Match Document Mode, the Content Plan Viewer tree is streamlined with functionality and actions that are targeted for managing matched documents.
* The hierarchy of the tree is displayed but only Content Plan Items can be selected.
* When the **Match Document Mode** object action is active and configured, Content Plan Items can only be selected if they meet the action configuration and permissions.
* The tree hyperlinks are disabled in Match Document Mode to maintain focus on managing matched documents.
* The mini browser is available upon hover when managing matches necessitates accessing records.
* The Content Plan Viewer Actions menu within the tree is abbreviated with actions targeted for managing matched documents, such as locking/unlocking and removing/excluding.
* Filters and views set in the Content Plan Viewer persist in Match Document Mode. This includes **Show/Hide Inactive** for Content Plans and Content Plan Items. Filters and Views (including Show/Hide Inactive) set in the Content Plan Viewer persist in Match Document Mode, however you cannot adjust them once in Match Document Mode.
* You can use **Expand** from the **All Actions** menu to expand the content plan viewer tree to the document level. This expands to the match document level up to a maximum of 2000 documents.
* A Content Plan Item can be selected for manually matching by scrolling and clicking on the Content Plan Item in the tree. When the Content Plan Item is selected, the tree expands to show matched document(s) if a document is matched to the Content Plan Item.
|Document matched to inactive Content Plan Item record; Vault displays the icon corresponding to the document's file format, e.g., Microsoft Word|
See details below about [working with _Inactive_ records in the Hierarchy Viewer][5].
### Breadcrumbs {#breadcrumbs}
When you open the viewer, the breadcrumb trail at the top of the screen reflects the _Application_ and _Submission_ records, _Event_ record, or _Report Level Content Plan_ record, depending on the content plan type. If you didn't open the content plan from its root, the breadcrumb trail and viewer title also include the root _Content Plan_ record. Clicking a link in the breadcrumb trail navigates you directly to that record.
When you click a Content Plan record's name in the grid, Vault shows that record as the root and updates the breadcrumb trail to reflect your selection. Clicking a link to a content plan section or content plan item in the breadcrumb trail refreshes the grid to display that section.
### Status Icon {#status-icon}
A status icon above the grid indicates any current jobs that are queued or processing in the background. A green checkmark icon () indicates that Vault is not currently running an operation. A yellow clock icon () indicates that Vault is processing an operation. Hover over the icon to see which operation is currently processing, or click the icon to refresh the status.
Actions which trigger the icon to change include:
* _Copy into Content Plan_ when the current _Content Plan_ is the source
* _Copy into Content Plan_ when the current _Content Plan_ is the target
* _Split Content Plan Item_
* _Update Content Plan_
* Asynchronous state changes via the _Content Plan Hierarchy State Change_ action
## Customizing the Hierarchy Viewer Grid
The Content Plan Hierarchy Viewer offers options for customizing the grid appearance:
### Resizing Columns
Resize the width of each column by dragging the edges of the column heading. An orange dotted line appears while you drag. You can't resize row height manually, as Vault automatically adjusts row height to fit the cell text.
### Rearranging Columns
Change the order of columns for each object by clicking and dragging the column header to a new location in that object's column group. A blue dotted line appears to highlight the new location while you drag. You cannot move the **Name** column.
### Adding or Removing Columns
To add or remove columns, select **Edit Columns** from the main **Actions** menu. Vault opens a dialog of fields sorted by object and matched document. From the dialog box, you can move fields between the _Available Columns_ box and the _Selected Columns_ box. In the _Selected Columns_ box, rearrange the column order using the **Up** and **Down** arrow buttons. To reset all settings to default, click **Restore**.
You cannot remove or rearrange the **Name** column. To improve performance, we recommend adding no more than 16 columns, including the **Name** column.
### Customizing Column Text Appearance
Sometimes text is too long to fit properly inside its column. In the main **Actions** menu, the **Truncate Cell Text** and **Wrap Cell Text** options let you toggle between truncating and wrapping cell text.
## Filtering the Hierarchy Viewer Grid {#filters}
Some columns in the grid include a **Filter** () icon. When this icon is available, you can apply a filter on that content plan, content plan item, or matched document field. Vault applies your filters to the entire content plan.
### Filtering Options
You can use the one-click filter chip buttons in the top left of the screen to customize the view.
* **Show Active/Inactive** toggles between showing and hiding inactive records.
* **Show Favorites Only** narrows down to selected (starred) Content Plan and Content Plan Item records within the context of the same Root Content Plan.
* **Show/Hide Content Plan Items** provides a read-only view of the Content Plan sections and Matched Documents only. When Content Plan Items are hidden, no actions may be taken on the documents or visible Content Plan records. A popup banner alerts users that no actions may be taken while in this viewing mode.
### Applying Filters
To apply a filter, click the **Filter** icon, select or enter a filter value, and click **Apply**. You can only filter on one object at a time. For example, if you've applied filters to a content plan item field, you can apply filters to other content plan item fields, but you can't apply filters on any content plan or matched document fields. You can only filter on one text field at a time, including _Name_.
Applied filters appear under the _Filters_ section above the grid. You can click the **caret** icon next to _Filters_ to hide or view your applied filters. All filtered results appear in the grid until you refresh the page, even if you update values so that they no longer meet filter criteria or so that additional items meet filter criteria.
### Available Filters
You can filter on any Text, Number, Date, Picklist, Object, Lifecycle State, and Yes/No content plan, content plan item, and standard fields. When filtering on Picklist, Object, or Lifecycle State fields, you can only select values that are associated with records in the content plan.
You can also filter on the _Version is Locked_, _Is Latest Version_, _Lifecycle State_, and _Ready for Publishing_ matched document fields, in addition to _Type_ and _Name_.
#### Filtering by Type {#filter-by-type}
When you filter by _Type_, Vault only displays standard columns and columns for the selected type, and results don't appear in a hierarchical structure. The _Type_ filter is available for content plans, content plan items, and matched documents.
#### Filtering by Name
When you filter on the _Name_ column, Vault includes both content plan and content plan items in results. You can't apply filters to other text fields when you filter by _Name_.
### Filtering by Current User
When you filter a column referencing the _User_ object (_Created By_, _Last Modified By_, etc.), Vault includes _Current User_ at the top of the filter list. Selecting _Current User_ filters results based upon the logged-in User applying the filter, allowing for more dynamic filtering, which is especially useful for creating and sharing Saved Views.
### About the Filter Icon
The **Filter** icon appears differently depending on what filters you've already applied:
|Icon|Status|
|--- |--- |
||Column available to filter|
||Filter applied|
||Column not available based on applied filters|
### Removing Filters
To remove filters, you can click the **X** button to clear individual filters or **Clear All Filters** at once. If you view another record as root after you apply filters, Vault automatically clears filters when the screen refreshes. You can use the breadcrumb trail or click your browser's **Back** button to return to your filtered view. If you open a record's details page to view or edit it, Vault reapplies your filters when you return to the viewer.
## Using Saved Views {#views}
Views allow you to save or "bookmark" your current columns, filters, and grid settings and return to this view with a single click. The Using Saved Views in RIM article discusses using views in the Content Plan Hierarchy Viewer, although much of the functionality is similar to custom views in the Library.
In order to use views in the Content Plan Hierarchy Viewer, either the _Submission_ or the _Report Level Content Plan_ field must be populated on the root _Content Plan_ record. Views are specific to submission content plans or report level content plans. For example, if you are working in a submission content plan, you can only select submission content plan views and not report level content plan views.
## Working in the Hierarchy Viewer Grid
This section discusses options for working with records in the grid.
### Inline Editing
You can inline edit object record fields in the grid. You cannot use inline editing on Matched Document fields in the grid.
### Creating Records {#creating-records}
Within a content plan section, you can create sibling _Content Plan_ and _Content Plan Item_ records:
1. From a record's grid item **Actions** menu, select **Create Sibling** or **Create Child**.
2. Choose the object for which you want to create records and the object type, if available. Vault may automatically select an object and type and progress you to the record creation dialog depending on your permissions.
3. In the dialog, fill in the record fields. Vault automatically populates the _Content Plan_, _Application_, _Primary Application_, _Submission_, _Primary Submission_, _Related Grouped Submission_, _Report Level Content Plan_, certain _Submission_ joins or _Report Level Content Plan_ joins, and certain matching fields based on the record from which you started the action. You can select different values in most of these fields, if desired.
4. Click **Save** to create the record, or **Save + Create** to create additional records. Each time you save a record, Vault creates it immediately, and it appears inline in the viewer.
You cannot create child records from _Inactive_ records or sibling records from the root _Content Plan_ record. These actions are not available if any filters except **View as Root** are applied.
### Viewing as Root {#view-as-root}
When you **View As Root**, Vault updates the [breadcrumb trail][14] and lists your selection under **Filters**, along with any other filters you've already applied. You can use the breadcrumb trail to navigate the content plan tree structure. You can also click the **X** button next to the _View As Root_ filter or select **Clear All Filters** to return to the original view.
You can initiate the **View As Root** action to display a record as the root level in the grid. You can view a record as the root in one of two ways:
* Click the record's name
* Click the **View As Root** icon () next to the record's name; this option is only available when a content plan section has more than 2,000 descendants
### Expanding Sections
You can expand a content plan section to see all its descendant content plans and content plan items at once. From a _Content Plan_ record's grid item **Actions** menu, select **Expand**. Vault displays all content plans and content plan items in the section, but not matched documents.
You won't see this action if the content plan section has no descendants or has the **[View As Root][3]** icon. If the content plan section has more than 2,000 descendants, expanding the section will only load up to 2,000 records. You'll need to **View as Root** to see the remaining descendants.
### Collapsing Sections
To collapse a content plan section, open the _Content Plan_ record's grid item **Actions** menu and click **Collapse**. Vault automatically collapses any expanded descendant content plan, content plan item, and matched document rows in that section.
### Using Bulk Actions
You can use bulk object record actions in the grid to edit and delete records. To perform a bulk action, you must first [filter by _Type_][16].
After selecting an object in the _Type_ filter, you can initiate the bulk action from the **[main Actions menu][17]**. Vault only applies the bulk action to the filtered results in your current view.
### Reordering {#reordering}
You can reorder _Content Plans_ and _Content Plan Item_ records using drag and drop or by selecting a reposition action from the _Actions_ menu for the record you want to move.
To reorder _Content Plans_ and _Content Plan Items_ using drag and drop, drag the record and drop it on its target location among its siblings within the same parent _Content Plan_ record. When dropped on the target location, Vault moves the record and all of its child nodes (_Content Plans_, _Content Plan Items_, and matched documents) to the new location.
To reorder _Content Plans_ and _Content Plan Items_ using the _Actions_ menu:
1. Open your _Content Plan_ in the viewer and remove any applied filters.
2. Open the grid item **Actions** menu for the record you want to move.
3. Select an action under **Reposition**, for example **Move to Bottom** to reposition as the last item in the list. If you select **Set Exact Position**, the **Set Position of Record Within List** dialog opens. Enter a position for your record. The position is a number representing the place in the order of all records in the list. For example, entering _3_ places the record third in the list.
4. Click **OK**. Vault reorders the object records.
### Opening the Submissions Archive Viewer (RIM Submissions Archive)
When the content plan's corresponding _Submission_ record has been published or imported, you can click the **Open Submissions Archive Viewer** icon to open the **Viewer** tab filtered to the correct _Application_ and _Submission_.
### Opening the Submission Ready Binder (RIM Submissions)
You can click the **View Submission Ready Binder** icon to open a _Submission Ready_ binder directly from the Hierarchy Viewer. You'll only see this button for published content plans that reference the _Submission Ready_ binder.
### Generating Automated Links (RIM Submissions Publishing)
When Automated Linking is configured, the **Create Automated Links** action is available for individual records and allows publishers to generate hyperlinks.
### Evaluating Links (RIM Submissions Publishing)
When Link Evaluator is configured, the **Evaluate Links** action is available for individual records and allows users to view all links in a given Submission, as well as identify and retarget broken links within _Content Plan Item_ matched documents.
## Copying Into Content Plan Sections {#copy-section}
In the Content Plan Hierarchy Viewer, you can drag and drop to copy a content plan section or item from a source content plan to the desired location in the target content plan. Copying a content plan section or item allows you to reuse existing content and prevent duplicate work. When you copy a content plan section, Vault includes the source _Content Plan_ or _Content Plan Item_ records and join records. You can also choose to copy matched documents and preserve version locking. See Copying Into Content Plans for more information.
## Working with Matched Documents
This section discusses working with matched documents in the grid.
### Matched Document Actions {#matched-document-actions}
There are several actions available from a matched document's **Actions** menu in the grid:
* **Lock Version**: Lock the content plan item to a specific document version
* **Unlock Version**: Unlock a matched document version from the content plan item
* **Exclude Document**/**Remove Document**: Unmatch a document from a content plan item
These actions are not available on documents matched to inactive _Content Plan Item_ records.
### Match Document Mode {#match-document-mode}
**Match Document Mode** facilitates the process of manually matching documents within the Content Plan Viewer with a pre-filtered document picker that makes it easy to search for and match documents without having to navigate away from the Content Plan Viewer to match. You can launch Match Document Mode to manually match documents within the Content Plan Viewer from the grid's **Actions** menu or from the Content Plan Item action menu when the **Match Document Mode** object action is active and configured.
#### Match Document Mode Content Plan Viewer Tree
In Match Document Mode, the Content Plan Viewer tree is streamlined with functionality and actions that are targeted for managing matched documents.
* The hierarchy of the tree is displayed but only Content Plan Items can be selected.
* When the **Match Document Mode** object action is active and configured, Content Plan Items can only be selected if they meet the action configuration and permissions.
* The tree hyperlinks are disabled in Match Document Mode to maintain focus on managing matched documents.
* The mini browser is available upon hover when managing matches necessitates accessing records.
* The Content Plan Viewer Actions menu within the tree is abbreviated with actions targeted for managing matched documents, such as locking/unlocking and removing/excluding.
* Filters and views set in the Content Plan Viewer persist in Match Document Mode. This includes **Show/Hide Inactive** for Content Plans and Content Plan Items. Filters and Views (including Show/Hide Inactive) set in the Content Plan Viewer persist in Match Document Mode, however you cannot adjust them once in Match Document Mode.
* You can use **Expand** from the **All Actions** menu to expand the content plan viewer tree to the document level. This expands to the match document level up to a maximum of 2000 documents.
* A Content Plan Item can be selected for manually matching by scrolling and clicking on the Content Plan Item in the tree. When the Content Plan Item is selected, the tree expands to show matched document(s) if a document is matched to the Content Plan Item.
 #### Match Document Mode Document Picker
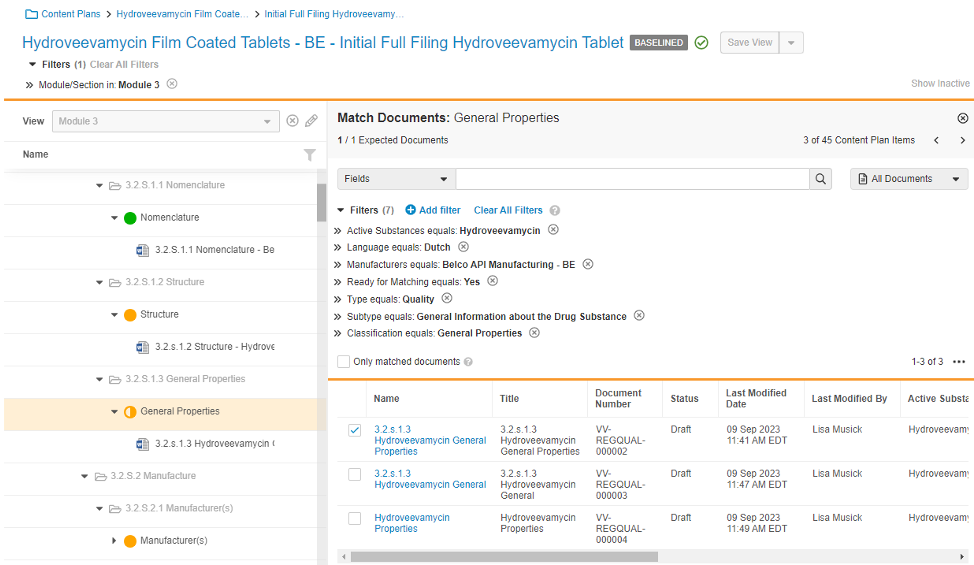
When you launch **Match Document Mode** from the Content Plan Viewer, the document picker displays on the right.
The banner at the top of the document picker dynamically displays the name of the Content Plan Item in focus in the Content Plan Viewer Tree. It also displays the following:
* The matched document count and the expected document count (Expected Steady State Count).
* The total number of Content Plan Items in the Content Plan Viewer tree within Match Document Mode and the number of the Content Plan Item in focus in relation to the total number of Content Plan Items in the tree.
* Traversal buttons navigate to the next or previous Content Plan Item in the tree.
The document picker is prefiltered based on the auto-matching criteria.
#### Match Document Mode Document Picker
When you launch **Match Document Mode** from the Content Plan Viewer, the document picker displays on the right.
The banner at the top of the document picker dynamically displays the name of the Content Plan Item in focus in the Content Plan Viewer Tree. It also displays the following:
* The matched document count and the expected document count (Expected Steady State Count).
* The total number of Content Plan Items in the Content Plan Viewer tree within Match Document Mode and the number of the Content Plan Item in focus in relation to the total number of Content Plan Items in the tree.
* Traversal buttons navigate to the next or previous Content Plan Item in the tree.
The document picker is prefiltered based on the auto-matching criteria.
 #### Match Document Mode Filters
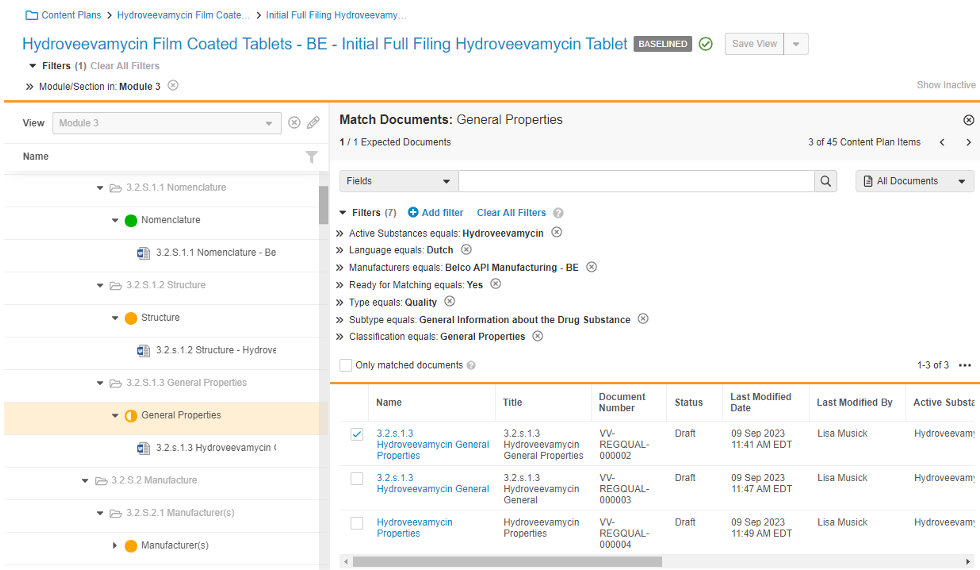
The document picker contains a list of suggested matches from the Vault Library for a Content Plan Item based on the document picker filters, text search, and scope.
* The document picker defaults the filters based on the auto-matching criteria set for each Content Plan Item. You can adjust to narrow or expand the search for documents to match.
* The default filters included come from the values selected in content plan item matching fields. The values for each of the filters is based on the corresponding field values on the content plan item. If a field is included in content plan item matching fields but the _Content Plan Item_ field is blank, the filter looks for documents that also have the field blank.
* Clear defaulted filters by selecting **Clear All Filters**, or select **Restore Default Filters** to remove any filters you have applied.
* New filters can be added by selecting **Add Filter**.
* Narrow or expand the list of potential matches with a text search on document **Fields** or **Fields and Content**. Matches can also be filtered using the scope dropdown to further filter the Vaults' documents by All Documents, Recent Documents, My Documents, and Favorites.
* Matches can also be filtered using the scope dropdown to further filter the Vaults' documents by All Documents, Recent Documents, My Documents, and Favorites.
* The *Only matched documents* checkbox filters out unmatched documents for a Content Plan Item when the list of potential matches (in the document picker) lists both matched and unmatched documents that meet the filter criteria for the Content Plan Item.
* You can use the pin icon next to a filter to pin the filter to narrow down document lists for suggested matching. The pinned filter preserves the field, operator, and value when moving to a new Content Plan Item.
* Filters are automatically set for Product and Variant based on the existence of Submission Product relationships.
#### Match Document Mode Grid of Potential Matches
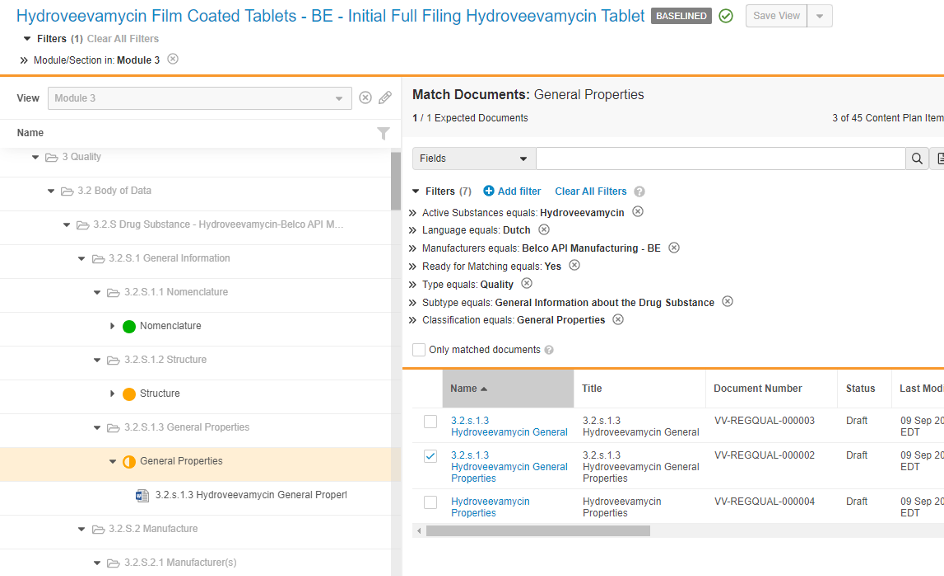
The document picker contains a grid of suggested document matches that meet the Content Plan Items' filter criteria.
* The name column within the grid is static displaying the name of the document, and is a hyperlink that when selected will launch a mini browser to view the document.
* Any one of the grid columns can be sorted in ascending or descending order.
* The columns in the grid can be modified to add, remove, and reorder columns by selecting **Edit Columns** from the grid actions menu. Columns can also be reordered using the drag and drop method.
#### Matching and Managing Documents in Match Document Mode
Match Document Mode can be used to manually manage document matches for Content Plan Items within the Content Plan Viewer. To manage a document match, select a Content Plan Item using one of the following methods:
* Manually scroll and select the record using the Content Plan Viewer Tree
* Select one of the traversal buttons in the document picker banner to view the next or previous Content Plan Item in the tree based on the current record selection.
Once the focus within the Content Plan Viewer tree is on the desired Content Plan Item, the document picker displays a list of potential matches in the grid that meet the filter criteria set for the Content Plan Item.
You can manage matches for the Content Plan Item by:
* Matching a document by selecting the checkbox for the document, or unmatching by de-selecting the checkbox.
* Dragging and dropping an individual document from the document picker grid to match it to any Content Plan Item in the tree.
* Removing, excluding, locking, or unlocking document matches using the Content Plan Viewer tree actions menu.
* Matching a document to an inactive Content Plan Item.
* Removing or excluding a document from a locked Content Plan Item. This action both unlocks and unmatches the document from the Content Plan Item in one step.
* Reordering matched documents, for a Content Plan Item in the tree, by dragging and dropping matched document rows.
* Splitting an overmatched Content Plan Item using the **All Actions** menu in the tree.
* Matching or unmatching documents in bulk using **Select All** or **Deselect All**.
#### Match Document Mode Filters
The document picker contains a list of suggested matches from the Vault Library for a Content Plan Item based on the document picker filters, text search, and scope.
* The document picker defaults the filters based on the auto-matching criteria set for each Content Plan Item. You can adjust to narrow or expand the search for documents to match.
* The default filters included come from the values selected in content plan item matching fields. The values for each of the filters is based on the corresponding field values on the content plan item. If a field is included in content plan item matching fields but the _Content Plan Item_ field is blank, the filter looks for documents that also have the field blank.
* Clear defaulted filters by selecting **Clear All Filters**, or select **Restore Default Filters** to remove any filters you have applied.
* New filters can be added by selecting **Add Filter**.
* Narrow or expand the list of potential matches with a text search on document **Fields** or **Fields and Content**. Matches can also be filtered using the scope dropdown to further filter the Vaults' documents by All Documents, Recent Documents, My Documents, and Favorites.
* Matches can also be filtered using the scope dropdown to further filter the Vaults' documents by All Documents, Recent Documents, My Documents, and Favorites.
* The *Only matched documents* checkbox filters out unmatched documents for a Content Plan Item when the list of potential matches (in the document picker) lists both matched and unmatched documents that meet the filter criteria for the Content Plan Item.
* You can use the pin icon next to a filter to pin the filter to narrow down document lists for suggested matching. The pinned filter preserves the field, operator, and value when moving to a new Content Plan Item.
* Filters are automatically set for Product and Variant based on the existence of Submission Product relationships.
#### Match Document Mode Grid of Potential Matches
The document picker contains a grid of suggested document matches that meet the Content Plan Items' filter criteria.
* The name column within the grid is static displaying the name of the document, and is a hyperlink that when selected will launch a mini browser to view the document.
* Any one of the grid columns can be sorted in ascending or descending order.
* The columns in the grid can be modified to add, remove, and reorder columns by selecting **Edit Columns** from the grid actions menu. Columns can also be reordered using the drag and drop method.
#### Matching and Managing Documents in Match Document Mode
Match Document Mode can be used to manually manage document matches for Content Plan Items within the Content Plan Viewer. To manage a document match, select a Content Plan Item using one of the following methods:
* Manually scroll and select the record using the Content Plan Viewer Tree
* Select one of the traversal buttons in the document picker banner to view the next or previous Content Plan Item in the tree based on the current record selection.
Once the focus within the Content Plan Viewer tree is on the desired Content Plan Item, the document picker displays a list of potential matches in the grid that meet the filter criteria set for the Content Plan Item.
You can manage matches for the Content Plan Item by:
* Matching a document by selecting the checkbox for the document, or unmatching by de-selecting the checkbox.
* Dragging and dropping an individual document from the document picker grid to match it to any Content Plan Item in the tree.
* Removing, excluding, locking, or unlocking document matches using the Content Plan Viewer tree actions menu.
* Matching a document to an inactive Content Plan Item.
* Removing or excluding a document from a locked Content Plan Item. This action both unlocks and unmatches the document from the Content Plan Item in one step.
* Reordering matched documents, for a Content Plan Item in the tree, by dragging and dropping matched document rows.
* Splitting an overmatched Content Plan Item using the **All Actions** menu in the tree.
* Matching or unmatching documents in bulk using **Select All** or **Deselect All**.
 #### Single Document Drag and Drop
Note: You cannot drag and drop from Desktop or from another Vault Library window into Match Document Mode. This functionality is still available to use in the Content Plan Viewer outside of Match Document Mode.
 ### Dragging & Dropping to Match Documents {#drag-and-drop}
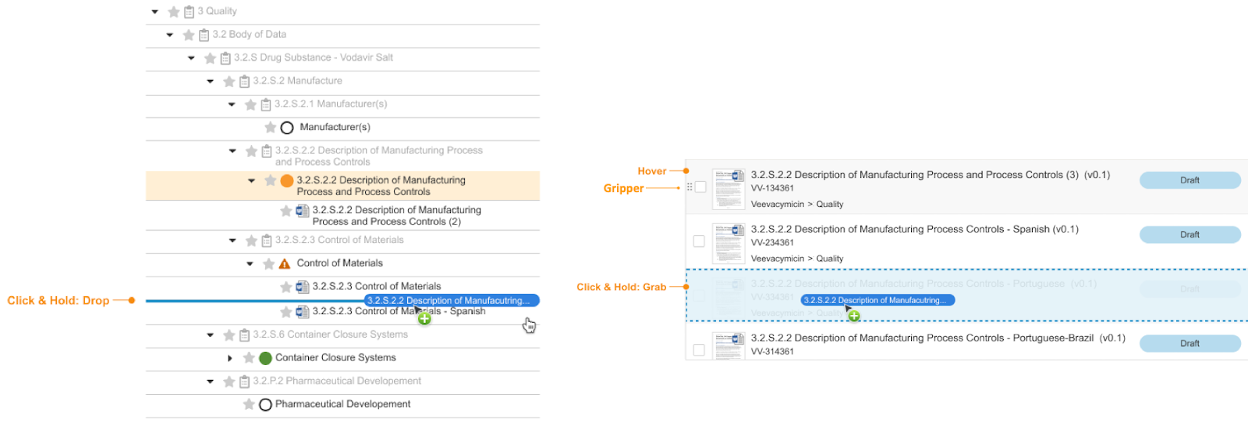
You can match documents in the Content Plan Hierarchy Viewer by dragging and dropping documents onto _Content Plan Item_ records in the grid. Vault allows you to upload and match up to 250 documents from your desktop, or you can drag and drop individual documents for matching from several Vault locations.
#### Drag & Drop from the Desktop {#drag-drop-desktop}
### Dragging & Dropping to Match Documents {#drag-and-drop}
You can match documents in the Content Plan Hierarchy Viewer by dragging and dropping documents onto _Content Plan Item_ records in the grid. Vault allows you to upload and match up to 250 documents from your desktop, or you can drag and drop individual documents for matching from several Vault locations.
#### Drag & Drop from the Desktop {#drag-drop-desktop}
Note: When duplicate content detection is enabled, Vault compares the Checksum value of any existing documents with the Checksum of the documents you are dropping. When two such documents have the same Checksum, Vault matches the existing document instead of creating a new one. If there are multiple documents with the same Checksum, the document created first is matched. After completing the upload, review the upload status for the files in the dialog that is temporarily displayed in the bottom right of the screen. You can also compare the Created Date column on the matched documents in the Content Plan Viewer to see if existing documents were matched. Additionally, with duplicate content detection, Vault does not consider existing Submissions Archive documents as duplicate content. This is to prevent Submissions Archive documents from being published, as it is not currently supported.
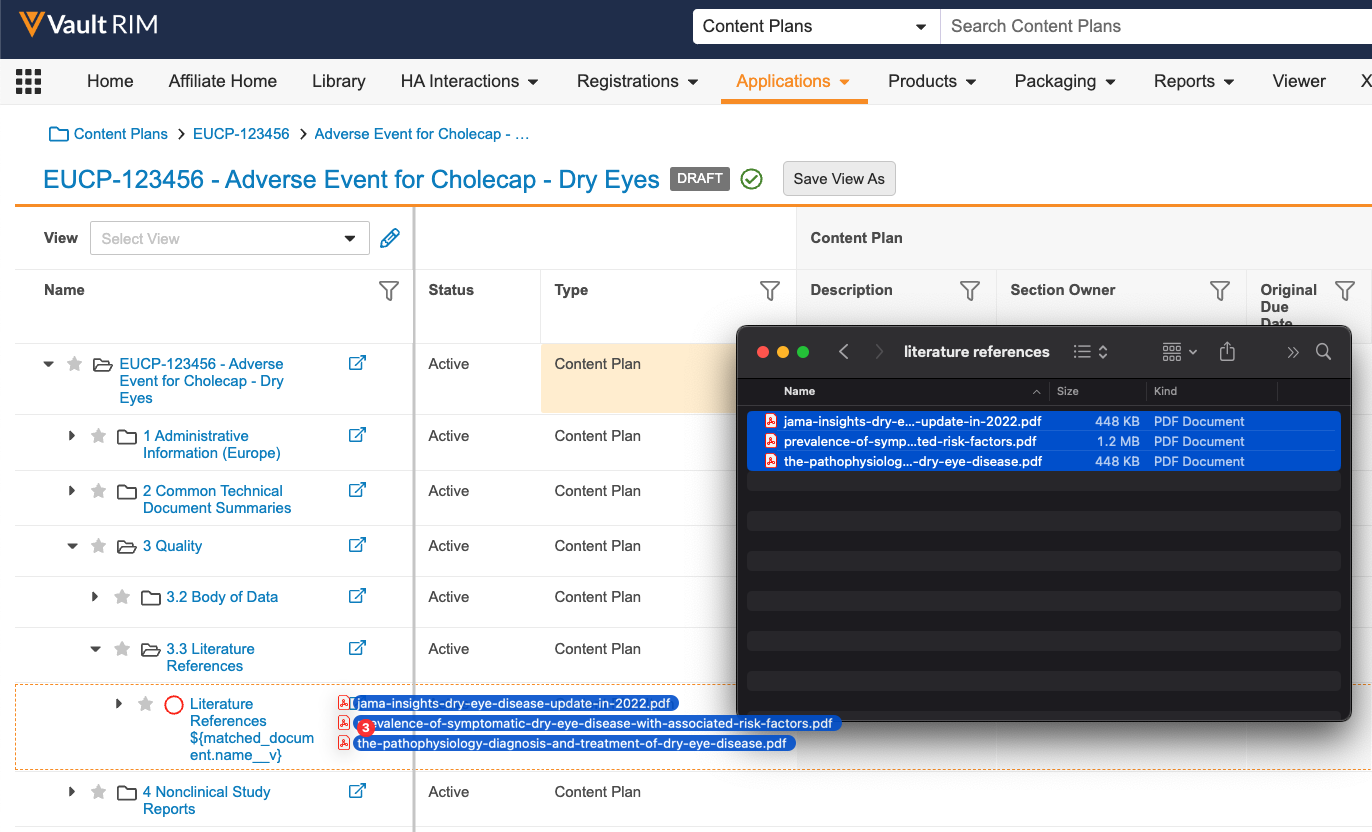 4. Drop the documents onto the _Content Plan Item_. For _Content Plan Items_ without a _Full Document Type_, Vault prompts you to classify the documents by selecting a _Type_, _Subtype_, and/or _Classification_. Select the appropriate value and click **Next** to continue. Note that the _Content Plan Item_ record is not updated with the selected values.
5. In the **Upload File** dialog, confirm or populate the field values to be applied to all documents in the drop, then click **Save**. When duplicate content detection is enabled, these field values are only applied to newly created documents. They are not applied to existing documents that are matched from the Library.
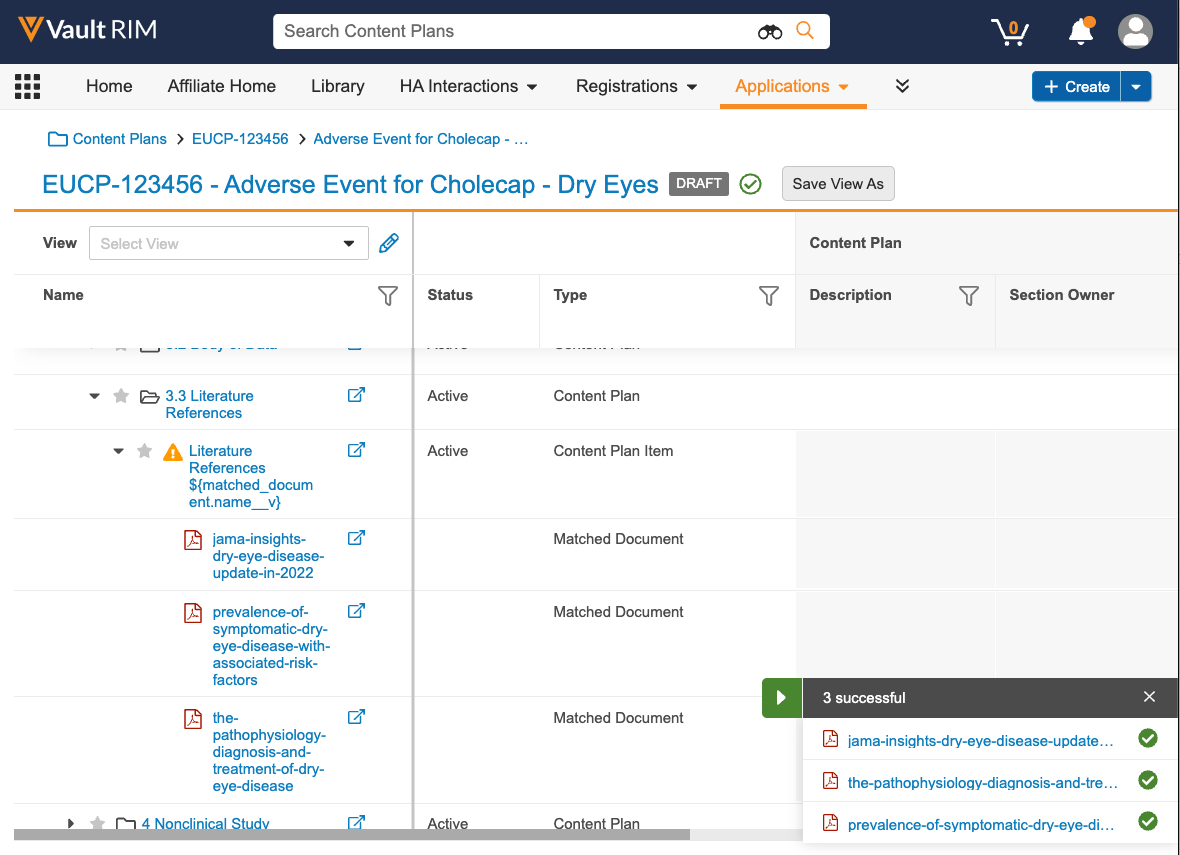
6. When Vault begins to create and match documents, you'll see a dialog in the bottom right of the screen that lists the status of all files.
* Use the arrow icon (
4. Drop the documents onto the _Content Plan Item_. For _Content Plan Items_ without a _Full Document Type_, Vault prompts you to classify the documents by selecting a _Type_, _Subtype_, and/or _Classification_. Select the appropriate value and click **Next** to continue. Note that the _Content Plan Item_ record is not updated with the selected values.
5. In the **Upload File** dialog, confirm or populate the field values to be applied to all documents in the drop, then click **Save**. When duplicate content detection is enabled, these field values are only applied to newly created documents. They are not applied to existing documents that are matched from the Library.
6. When Vault begins to create and match documents, you'll see a dialog in the bottom right of the screen that lists the status of all files.
* Use the arrow icon ( ) to open and close the dialog.
* From the document list, you can see when a document has been uploaded () and matched (), when a duplicate document has been matched (
) to open and close the dialog.
* From the document list, you can see when a document has been uploaded () and matched (), when a duplicate document has been matched ( ), and if there have been any errors. Hover over the red error icon to view more information.
* You are free to perform other operations within your Vault, including dropping additional documents onto the target record or any other _Content Plan Item_ while keeping track of the upload and matching progress.
7. Once complete, the arrow icon and dialog header reflects the drop's overall final status (for example, _3 successful_).
), and if there have been any errors. Hover over the red error icon to view more information.
* You are free to perform other operations within your Vault, including dropping additional documents onto the target record or any other _Content Plan Item_ while keeping track of the upload and matching progress.
7. Once complete, the arrow icon and dialog header reflects the drop's overall final status (for example, _3 successful_).
 #### Other Drag & Drop Methods {#other-drag-drop-methods}
To match individual existing Vault documents in the Content Plan Hierarchy Viewer from the Library, Cart, a report, or a binder:
1. Open the viewer in one window and a list of documents in another.
2. Identify the document you want to match.
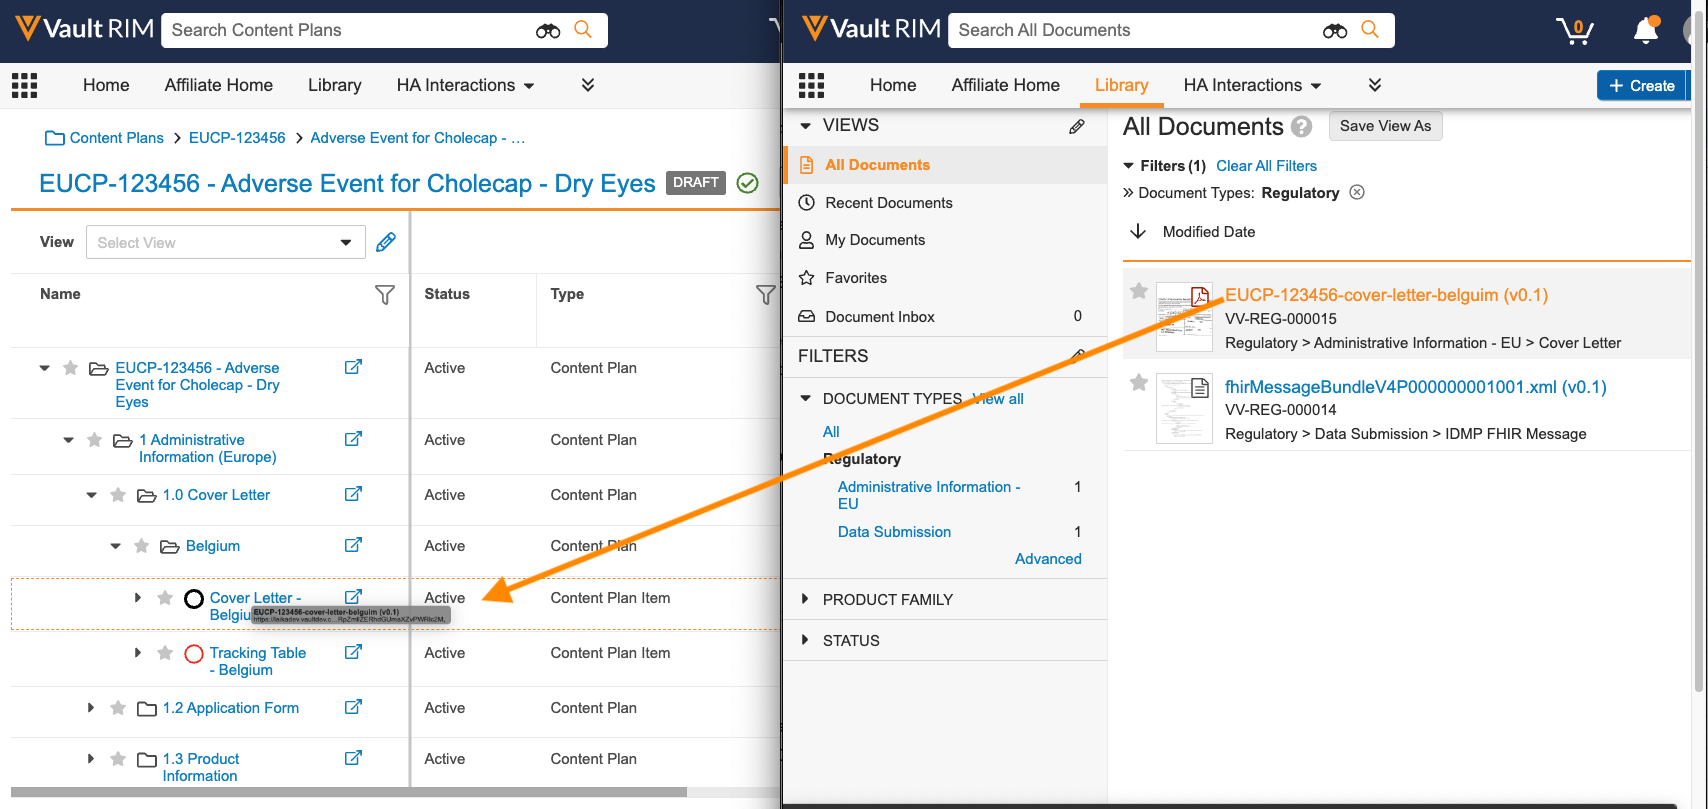
3. Click the document's link and drag it onto the content plan item or to a specific matched document position in the grid. Vault shows an orange dotted line around the item where the document will be matched.
4. Drop the document onto the content plan item. When the document matches successfully, Vault displays a banner, expands the content plan item in the grid to show the matched document below, and updates content plan item completeness tracking fields in the grid dynamically.
When you drag and drop to match a document, Vault does not lock the matched document version to the content plan item. If you want to lock matched document versions, you can [manually lock versions][21] or you can use cascade document version locking.
#### Other Drag & Drop Methods {#other-drag-drop-methods}
To match individual existing Vault documents in the Content Plan Hierarchy Viewer from the Library, Cart, a report, or a binder:
1. Open the viewer in one window and a list of documents in another.
2. Identify the document you want to match.
3. Click the document's link and drag it onto the content plan item or to a specific matched document position in the grid. Vault shows an orange dotted line around the item where the document will be matched.
4. Drop the document onto the content plan item. When the document matches successfully, Vault displays a banner, expands the content plan item in the grid to show the matched document below, and updates content plan item completeness tracking fields in the grid dynamically.
When you drag and drop to match a document, Vault does not lock the matched document version to the content plan item. If you want to lock matched document versions, you can [manually lock versions][21] or you can use cascade document version locking.
 #### Matching to Inactive Content Plan Items
Depending on your Admin's configuration, you can also drag and drop to match documents to inactive content plan items. When you drop a document onto an inactive content plan item, Vault moves the content plan item and its parent records to an active lifecycle state before matching the document.
Vault does not match the document if the content plan item can't move to an active state. If the content plan item moves to an active state but you can't match the document, the content plan item and its parent records remain in an active state. If you drop the document onto an incorrect content plan item, you must remove the document and move the record and its parents back to the _Inactive_ state manually.
## Starting a Workflow {#multi-document-workflow}
You can start a document workflow directly from the Content Plan Hierarchy Viewer to send matched documents for review and approval. When you start the workflow, Vault includes up to 100 documents matched to active _Content Plan Item_ records in your current, filtered grid view.
You can also start an object workflow directly from the Content Plan Hierarchy Viewer on up to 100 _Content Plan_ or _Content Plan Item_ records for a selected object. The available workflows depend on the workflows configured for the object records' lifecycle states and the user's permissions.
See Starting a Workflow in the Content Plan Hierarchy Viewer for more information.
## Using the Embedded Document Viewer
You can use the embedded document viewer to review documents in the same tab juxtaposed with the Content Plan hierarchy. Clicking on a Matched Document link within the Content Plan Viewer reveals an embedded document viewer that overlays the grid columns. This embedded document view allows reviewers to view document content and confirm the correct document has been matched, without having to return to the Library or use the pop-out document viewer.
Full document actions, such as authoring, state change/workflows, Annotations, document metadata updates, and Bookmark Editing are not available in the embedded document viewer and must be completed in the Library or pop-out document viewer.
## Using the Mini-Browser {#pop-out-viewer}
You can click the pop-out icon (
#### Matching to Inactive Content Plan Items
Depending on your Admin's configuration, you can also drag and drop to match documents to inactive content plan items. When you drop a document onto an inactive content plan item, Vault moves the content plan item and its parent records to an active lifecycle state before matching the document.
Vault does not match the document if the content plan item can't move to an active state. If the content plan item moves to an active state but you can't match the document, the content plan item and its parent records remain in an active state. If you drop the document onto an incorrect content plan item, you must remove the document and move the record and its parents back to the _Inactive_ state manually.
## Starting a Workflow {#multi-document-workflow}
You can start a document workflow directly from the Content Plan Hierarchy Viewer to send matched documents for review and approval. When you start the workflow, Vault includes up to 100 documents matched to active _Content Plan Item_ records in your current, filtered grid view.
You can also start an object workflow directly from the Content Plan Hierarchy Viewer on up to 100 _Content Plan_ or _Content Plan Item_ records for a selected object. The available workflows depend on the workflows configured for the object records' lifecycle states and the user's permissions.
See Starting a Workflow in the Content Plan Hierarchy Viewer for more information.
## Using the Embedded Document Viewer
You can use the embedded document viewer to review documents in the same tab juxtaposed with the Content Plan hierarchy. Clicking on a Matched Document link within the Content Plan Viewer reveals an embedded document viewer that overlays the grid columns. This embedded document view allows reviewers to view document content and confirm the correct document has been matched, without having to return to the Library or use the pop-out document viewer.
Full document actions, such as authoring, state change/workflows, Annotations, document metadata updates, and Bookmark Editing are not available in the embedded document viewer and must be completed in the Library or pop-out document viewer.
## Using the Mini-Browser {#pop-out-viewer}
You can click the pop-out icon ( ) next to each record or document in the grid pane to view that record in a mini-browser window while maintaining your current view in the grid. When you open another record or document from the Content Plan Hierarchy Viewer, Vault refreshes the current mini-browser window with the new details.
You must enable pop-ups in your browser to open the mini-browser viewer.
#### Refreshing the Mini-Browser
You can refresh the mini-browser by:
* Clicking the pop-out icon on a record
* Clicking the Name link of a record
* Clicking the Name cell of a record
* Collapsing/expanding a record using the carat
* Clicking the action menu of a record
* Clicking the favorite icon of a record
### Traversing the Mini-Browser
When you have both the Content Plan Hierarchy Viewer and the mini-browser window open, you can use your keyboard to easily navigate and update the object records and documents that are visible in your current grid view:
1. Open a document or object record in the mini-browser window.
2. Click **ALT + TAB** or manually click back into the Hierarchy Viewer screen.
3. Use the **Up** and **Down** arrow keys to traverse the **Name** column in the Hierarchy Viewer. Vault refreshes the mini-browser window each time you select a new object record or document. If you edit the record or document, Vault prompts you to save your changes before loading the new document or record.
### Working with Object Records
From the object record details page in the mini-browser window, you can:
* Edit and save record details
* Access the record's **Actions** menu
* Add or update matched documents
* Open matched or published documents
### Working with Matched Documents
When viewing a document in the mini-browser window, you can:
* Perform matched document actions
* Navigate document links
* Open object records from an object reference field
From the viewer, you can also select **Open Matched Document** or **Open Published Document** from a _Content Plan Item_ record's **Actions** menu to open a matched document in the mini-browser window.
## Using Keyboard Shortcuts
You can use keyboard shortcuts to help you navigate fields in the viewer.
## Exporting from the Hierarchy Viewer {#exporting}
You can export the detailed hierarchy view to Microsoft Excel. When you export the Excel tree, Vault downloads the current grid view and fields in XLSX format. The spreadsheet maintains the object and matched document column headers displayed in the viewer and includes worksheets listing the _Application_, _Submission_, and _Submission_ join record information for the content plan.
### How to Export the Excel Tree
To export the detailed hierarchy view to Microsoft Excel, open the **[main Actions menu][17]** and select **Excel Tree with All Descendants**. Vault exports the tree asynchronously and sends you an email and a Vault notification when complete.
### About the Excel Tree
Exporting an **Excel Tree with All Descendants** generates a formatted list, with a line in the spreadsheet for each record and columns for the content plan, content plan item, and matched documents fields in your current grid view. Vault exports the tree for record you are currently [viewing as the root][3], which allows you to export the entire content plan or only individual Modules or sections. Vault does not apply your [filters][26] to the export.
Indented records match the hierarchy in the viewer, visually representing parent, child, and sibling relationships between _Content Plans_, _Content Plan Items_, and matched documents. Values in the _Name_ column link back to the object record detail page or the document viewer. If you do not have the _View_ permission on a _Content Plan Item_ record included in the Excel Tree, that row will display "Access to this record is restricted" instead of that record's details.
When you hide inactive records in the viewer, Vault excludes all inactive _Content Plan_ and _Content Plan Item_ records from the **Excel Tree with All Descendants** export. Vault also excludes any active records that are descendants of an inactive _Content Plan_ section.
) next to each record or document in the grid pane to view that record in a mini-browser window while maintaining your current view in the grid. When you open another record or document from the Content Plan Hierarchy Viewer, Vault refreshes the current mini-browser window with the new details.
You must enable pop-ups in your browser to open the mini-browser viewer.
#### Refreshing the Mini-Browser
You can refresh the mini-browser by:
* Clicking the pop-out icon on a record
* Clicking the Name link of a record
* Clicking the Name cell of a record
* Collapsing/expanding a record using the carat
* Clicking the action menu of a record
* Clicking the favorite icon of a record
### Traversing the Mini-Browser
When you have both the Content Plan Hierarchy Viewer and the mini-browser window open, you can use your keyboard to easily navigate and update the object records and documents that are visible in your current grid view:
1. Open a document or object record in the mini-browser window.
2. Click **ALT + TAB** or manually click back into the Hierarchy Viewer screen.
3. Use the **Up** and **Down** arrow keys to traverse the **Name** column in the Hierarchy Viewer. Vault refreshes the mini-browser window each time you select a new object record or document. If you edit the record or document, Vault prompts you to save your changes before loading the new document or record.
### Working with Object Records
From the object record details page in the mini-browser window, you can:
* Edit and save record details
* Access the record's **Actions** menu
* Add or update matched documents
* Open matched or published documents
### Working with Matched Documents
When viewing a document in the mini-browser window, you can:
* Perform matched document actions
* Navigate document links
* Open object records from an object reference field
From the viewer, you can also select **Open Matched Document** or **Open Published Document** from a _Content Plan Item_ record's **Actions** menu to open a matched document in the mini-browser window.
## Using Keyboard Shortcuts
You can use keyboard shortcuts to help you navigate fields in the viewer.
## Exporting from the Hierarchy Viewer {#exporting}
You can export the detailed hierarchy view to Microsoft Excel. When you export the Excel tree, Vault downloads the current grid view and fields in XLSX format. The spreadsheet maintains the object and matched document column headers displayed in the viewer and includes worksheets listing the _Application_, _Submission_, and _Submission_ join record information for the content plan.
### How to Export the Excel Tree
To export the detailed hierarchy view to Microsoft Excel, open the **[main Actions menu][17]** and select **Excel Tree with All Descendants**. Vault exports the tree asynchronously and sends you an email and a Vault notification when complete.
### About the Excel Tree
Exporting an **Excel Tree with All Descendants** generates a formatted list, with a line in the spreadsheet for each record and columns for the content plan, content plan item, and matched documents fields in your current grid view. Vault exports the tree for record you are currently [viewing as the root][3], which allows you to export the entire content plan or only individual Modules or sections. Vault does not apply your [filters][26] to the export.
Indented records match the hierarchy in the viewer, visually representing parent, child, and sibling relationships between _Content Plans_, _Content Plan Items_, and matched documents. Values in the _Name_ column link back to the object record detail page or the document viewer. If you do not have the _View_ permission on a _Content Plan Item_ record included in the Excel Tree, that row will display "Access to this record is restricted" instead of that record's details.
When you hide inactive records in the viewer, Vault excludes all inactive _Content Plan_ and _Content Plan Item_ records from the **Excel Tree with All Descendants** export. Vault also excludes any active records that are descendants of an inactive _Content Plan_ section.
Note: Vault will not include the following characters in the file name of an export: < > : "" / | ? *