When managing Submission, Content Plan, Content Plan Item, and Report Level Content Plan records with a lifecycle, you can define various lifecycle state user actions, entry actions, entry criteria, or workflow system actions to create and update content plans. This allows users to perform various actions on content plans. For example, you can set up actions for users to copy from an existing content plan or create a binder from a content plan.
Before you can configure or use content plan functionality, your Vault must include both a Content Plan lifecycle and a Content Plan Item lifecycle.
Note: Submission content plans and report level content plans are only available on RIM Submissions Vaults. Global content plans require both RIM Submissions and RIM Registrations.
Actions & Criteria
You can configure the below actions and criteria. Some actions are available only for certain content plan types.
Actions for All Content Plans
- Change active related object lifecycle state (Entry Action): Enables Vault to only update the lifecycle states of related records that are in an Active status.
- Content Plan Hierarchy State Change (User Action or System Action): Changes the state of the current Content Plan record and all of its child Content Plan and Content Plan Item records asynchronously.
- Create Binder from Content Plan (System Action): Creates a Submissions-type binder directly from any content plan section. If configuring this action, ensure system-managed naming is configured correctly for the Submissions document type. If system-managed naming is not configured, Vault will name the binder using the name of the Content Plan record from which users initiate this action.
- Create from Document (User Action): User action that creates a new document from a document selected in the Create from Document field on the associated source Content Plan Item Template record and automatically matches it to the corresponding Content Plan Item. This action also lets users create a Table of Contents.
- Matched Documents are Version Locked (Entry Criteria): Checks whether all documents matched to a Content Plan Item record are locked to a steady state document version before moving the record into a specific state.
- Match Document Mode (User Action): Allows users to enter Match Document Mode for a Content Plan Item. Configure this action on the Content Plan Item object. When configuring this action, do not select the Available in all lifecycle states checkbox, as the Match Document Mode user interface is not compatible with this setting.
- Open Matched Document (User Action): Allows users to open a matched document from the Content Plan Hierarchy Viewer in a mini-browser window.
- Set Version Locking on Matched Documents (User Action): Sets the version locking for documents matched to Content Plan Item records within a content plan section.
- Split Content Plan Item (User Action): Creates additional Content Plan Items when the number of matched documents on a Content Plan Item record exceeds the number of expected documents.
- Update Tokens in Field (User Action for Content Plan Items): Updates unresolved tokens in the Name, XML Title, and Published Output Location fields on an individual Content Plan Item record. Vault updates records based on corresponding field values from the matched document and submission relationship fields.
- Update Tokens in Fields (User Action for Content Plans): Updates unresolved tokens in the Name, XML Title, and Published Output Location fields on multiple Content Plan Item records. Vault updates records based on corresponding field values from the matched document and submission relationship fields.
- Update Content Plan Study Section (Object Action for submission content plans): Allows users to update relevant metadata fields, then run the action to move records from one content plan section to another. The action is available for Submission Clinical Studies and Submission Nonclinical Studies only, and once enabled does not need to be configured as a separate user action. See Updating Content Plan Study Sections for configuration details.
Actions for Select Content Plans
- Create Content Plan and Content Plan Items (System Action or Entry Action for submission and report level content plans): Creates Content Plan and Content Plan Items for submission and report level content plans. This action also includes an option to Create Records as Inactive for submission content plans.
- Create Global Content Plan (System Action for global content plans): When configured in a workflow, creates and updates global plans.
- Copy Content Plan (System Action for submission content plans and report level content plans): Copies content plan sections, content plan items, submission join records, and matched documents from an existing content plan to a new Submission or report where a content plan has not been created yet.
- Dispatch Global Content Plan (User Action for global content plans): Allows users to dispatch global content plans from an Event record. When configured with content plan synchronization, you can allow users to additionally dispatch global content plans directly from a Content Plan record. See Configuring Content Plan Synchronization for more information.
- Merge and Publish Content Plan (User Action for submission content plans): Allows users to combine the PDF files matched within a submission content plan into a single merged PDF.
- Publish Documents and Create Submission Ready Binder (System Action for report level content plans): When configured in a workflow, allows users to publish directly from the content plan. When a workflow configuration includes the Merge PDF into a single PDF file option, Vault publishes and merges published documents into a single PDF file.
- Review Comparison (User Action for submission content plans and dispatch messages): Allows users to review and accept or reject the changes Vault will make to a market-specific Submission Content Plan based on comparison from a source Global Content Plan initiated during dispatch. See Configuring Content Plan Synchronization for more information.
- Regenerate Comparison (User Action for dispatch messages): Allows users to trigger a new comparison between the source Global Content Plan and market-specific Submission Content Plan. When running the action, Vault replaces the current comparison stored for the dispatch message. See Configuring Content Plan Synchronization for more information.
Create Content Plan and Content Plan Items
You can set up the Create Content Plan and Content Plan Items action to automatically trigger the creation and update of the Submission record’s content plan. You’ll need to create either lifecycle state entry actions or workflow system actions (Create Content Plan type for both) to trigger creation and update of the Submission record’s content plan.
To prevent users from triggering this workflow on a record that doesn’t have a Plan Template defined, we recommend making the workflow start or state change user action conditional.
You can also configure the Create Content Plan and Content Plan Items action to always create specific records as Active or Inactive, allowing users to quickly assemble small, daily submissions with only the necessary Active records. See Creating Records as Inactive for more information.
Copy Content Plan
You can set up the Copy Content Plan system action in an object workflow. This action automatically copies content plan sections, content plan items, submission or report level content plan join records, and matched documents from an existing content plan to a new one. This is useful when a new product or annual review needs to be submitted in multiple regions. Vault also maintains the lifecycle state of copied Content Plan and Content Plan Item records that are in an Inactive status.
Note: Copying a content plan is only available for submission content plans and report level content plans.
About Content Plan Template Constraints
Note: Template Constraints are not supported for report level content plans.
When you set up the Copy Content Plan action, you can choose whether or not to allow Vault to enforce content plan template constraints on the new content plan:
- If you don’t select the Ignore Content Plan Template Constraints checkbox, Vault creates sections in the new content plan based on the content plan template constraints configured for the target application and submission. In this case, Vault does not copy sections from the source content plan to the newly-copied content plan if the sections are excluded in the content plan template constraints. Vault also updates records to be Active or Inactive in the new content plan based on content plan template constraints.
- If you select the Ignore Content Plan Template Constraints checkbox, Vault creates the new content plan without applying content plan template constraints.
How to Configure Content Plan Advanced Copy
To set up Content Plan Advanced Copy, complete the following:
- Create an object workflow and enter a name easily understood by users, for example, Copy Content Plan. For copying submission content plans, choose the lifecycle that’s associated with the Submission object. For copying report level content plans, choose the lifecycle that’s associated with the Report Level Content Plan object.
- Create a workflow step using the Copy Content Plan label or another label that helps you identify it during workflow configuration.
- Edit the Start workflow step and add the Prompt for Fields control. Select the Copy From Content Plan or Copy Content Plan field and select the Required checkbox.
- Edit the Copy Content Plan step and select System Action from the Type picklist. Next, select Copy Content Plan from the System Action picklist.
- Optional for the Submission workflow: Select the Ignore Content Plan Template Constraints checkbox.
- Optional: Create additional steps for state changes before the End workflow step to indicate Content Plan is created (for example, Plan Drafted).
- For submission content plans, update the Submission’s object lifecycle to allow users to start the new workflow. For example, you can add a user action called Copy from Content Plan on the Planned and In Progress states.
- For report level content plans, update the Report Level Content Plan’s object lifecycle to allow users to start the new workflow. For example, you can add a user action called Copy Report on the Active state. You may also choose to create multiple user actions to appear for users conditionally based on the Report Level Content Plan Type, for example the Clinical Study Report type.
Create Binder from Content Plan
You can allow users to create or update a binder directly from any content plan section by setting up the Create Binder from Content Plan system action in an object workflow. With this action, Vault:
- Converts the selected content plan section into a binder, and any descending sections into binder sections.
- Creates a new binder, or up-versions the content plan’s existing binder.
- Associates all matched documents within the Content Plan object to the binder and maintains the content plan’s hierarchy.
How to Configure Create Binder from Content Plan
To set up the Create Binder from Content Plan system action, complete the following:
- Navigate to Admin > Settings > General Settings and click Edit.
- From the Expected Document List (EDL) Options section, choose a document type and lifecycle from the applicable picklist. This configures which document type and lifecycle to apply when creating the binder. For example, select Submission Document Type and Binder Lifecycle.
- Navigate to Admin > Configuration > Document Fields and select the Document Type that was configured in the previous step (for example, Submission). Add Existing Shared Field Created From to the document type. Note this is a read-only field.
- Navigate to Admin > Configuration > Objects and select the Content Plan. Add the Related Binder field to Object Types (if object types are enabled for the Content Plan) and assign the field to Page Layouts. Related Binder field should be set as read-only for all users (for example, through Field Level Security).
- Navigate to Admin > Configuration > Workflows. Create an object workflow and choose a lifecycle associated with the Content Plan (EDL) object.
- Create a workflow step with Create Binder from Content Plan label or another label that helps you identify it during workflow configuration.
- Edit the Create Binder from Content Plan step and select System Action from the Type picklist. Next, select Create Binder from Content Plan from the System Action picklist.
- Add the newly created workflow as user action on a Content Plan object lifecycle state.
Multilingual Document Handling
If you enabled multilingual document handling in Vault, all documents include the standard document Language field. By default, the Language field is required. When uploading a document, Vault attempts to assign a language automatically based on the document’s language. In order for the Create Binder from Content Plan action to function properly, you need to set the Language field to optional.
Content Plan Hierarchy State Change
The Content Plan Hierarchy State Change action changes the state of the current Content Plan record and all of its child Content Plan and Content Plan Item records asynchronously, meaning it runs in the background without preventing users from continuing their work. Users receive a notification to let them know when the state change is complete. You can configure this action as a user action on Content Plan lifecycle states or as part of a Content Plan object workflow.
Note: The Content Plan Hierarchy State Change action cannot be executed in bulk from the Perform Bulk Action menu. This Vault Platform feature does not support this and other asynchronous RIM actions.
How to Configure an Asynchronous State Change User Action
To configure a Content Plan Hierarchy State Change user action:
- Create a user action on the relevant Content Plan lifecycle state.
- In the drop-down, select Content Plan Hierarchy State Change.
- Select the Next State for the Content Plan record and its descendant records. The state you choose must have the same Name on the Content Plan Item lifecycle, for example,
baselined__c. - Optional: Choose one or more Excluded States. If descendant Content Plan or Content Plan Item records are in these lifecycle states, Vault excludes them from the state change. Vault excludes any descendant records that are already in the Next State by default.
- Recommended: Check Prevent action if one or more items are being processed to prevent users from initiating a state change while Vault is still processing publishing jobs. This option is recommended for entering the Locked state.
- Enter the Action Label that users will see in the Actions menu.
- Click Save.
- Repeat these steps for each relevant lifecycle state change.
How to Configure an Asynchronous State Change Object Workflow
Note: When the Content Plan Hierarchy State Change action is executed within a workflow, Vault logs the event as performed by the workflow initiator and sends them the resulting state change notification.
To configure the Content Plan Hierarchy State Change action in a workflow:
- Create a new object workflow and enter a name easily understood by users, for example, Change State from Draft to Baselined. Choose a lifecycle that is associated with the Content Plan object.
- Create a workflow step and enter a label such as State Change to help you identify it during workflow configuration.
- In the Type field, select System Action.
- In the drop-down under System Action Options, select Content Plan Hierarchy State Change.
- Select the Next State for the Content Plan record and its child records. The state you choose must be an active state in the Content Plan Item lifecycle, and it must have the same Name across both lifecycles, for example,
baselined__v. - Optional: Choose one or more Excluded States. If child Content Plan or Content Plan Item records are in these lifecycle states, Vault excludes them from the state change. The states you choose must be active states in the Content Plan Item lifecycle.
- Click Save to exit the step and continue configuring the workflow. You can add multiple Content Plan Hierarchy State Change system action steps in the same workflow, if desired.
Configuration Notes
- For every Content Plan Hierarchy State Change action that you configure, you should ensure that the Next State you select does not have the Change related object lifecycle state or Change active related object lifecycle state entry actions configured for descendant Content Plans and Content Plan Items. If these entry actions are configured in your Vault, you must remove them to prevent them from interfering with asynchronous state changes.
- Vault can update up to 10,000 descendant records during a single asynchronous state change. If your Vault contains very large content plans, you can contact Veeva Support to request an increase to this limit.
- Vault cannot perform an active to inactive state change while an Update Content Plan, Split Content Plan Item, Copy into Content Plan, or Dispatch Global Content Plan action is running in the same content plan.
Open Matched Document
The Open Matched Document user action allows users to open matched documents in the document viewer directly from a Content Plan Item record. You can set this up by configuring the user action on the Content Plan Item lifecycle.
Cascade Document Version Locking
The Set Version Locking on Matched Documents user action allows users to set the version locking for documents matched to Content Plan Items contained within a Content Plan section. You can set this up by configuring the user action on the Content Plan or Content Plan Item lifecycle.
Version Locking Actions
When setting up the Set Version Locking on Matched Documents user action, you can configure the following version locking actions:
- Remove Version Locking for All Matched Documents: This option returns documents to the unlocked state and matches the newest version of a document to the Content Plan Item.
- Lock All Unlocked Matched Documents to Latest Steady State Version: This option explicitly locks all unlocked documents to the current Steady state version. If no Steady state version exists, documents remain unlocked.
- Override Locking on All Matched Documents to Latest Steady State Version: This option explicitly locks all documents to the current Steady state version. If no Steady state version exists, documents remain unlocked.
When the Lock or Override options above are selected, you can also configure Vault to Include Latest Lockable State Version. This option enables Vault to use both the steady state version and the latest lockable version configured as a Lockable Document State. See EDL Administration for information about this setting.
Matched Documents are Version Locked
You can configure the Matched Documents are Version Locked entry criteria on Content Plan Item lifecycle states. When a Content Plan Item record moves to the defined lifecycle state, this entry criteria checks whether all documents matched to the record are locked to a steady state document version. If any matched document isn’t version-locked, Vault prevents the Content Plan Item record from moving to the next state. This ensures that finalized content plans don’t include documents that are not version locked. Note that this entry criteria will pass validation for Content Plan Item records that have no matched documents.
Changing Lifecycle States for Active Related Objects
You can configure the Change active related object lifecycle state entry action to only update the lifecycle states of related records that are in an Active status. When Vault changes the state of related records, this action skips Inactive records and all of their child records, keeping them in the Inactive status.
This entry action is available on object lifecycles associated with the Content Plan or Submission objects. When creating this action, select a Related Object for which to change the lifecycle state. In the Change State To drop-down, select the new state for that object. You can create multiple entry actions on the same lifecycle state to update the states of different related objects.
Note that if you configure both the Change active related object lifecycle state and the Change related object lifecycle state entry actions on the same lifecycle state for the same related object, Vault changes the state of all records, including Inactive records.
Split Content Plan Item
The Split Content Plan Item user action allows users to create additional Content Plan Items when the number of matched documents on a Content Plan Item exceeds the number of expected documents. This action also automatically resolves tokens in the Name, XML Title, and Published Output Location fields on the original and new Content Plan Item records.
You can set this up by configuring this action on the Content Plan Item object lifecycle, or any other object lifecycle associated with the Content Plan Item object.
Vault cannot perform this action while an Update Content Plan, Content Plan Hierarchy State Change, Copy into Content Plan, Content Plan Hierarchy State Change, Copy Content Plan, or Dispatch Global Content Plan action is running in the same content plan.
Update Tokens in Field(s)
Vault provides actions to update unresolved tokens in the Name, XML Title, and Published Output Location fields on a Content Plan Item record based on corresponding field values from the matched document or submission.
The Update Tokens in Field Content Plan Item action allows users to perform the action on individual Content Plan Items. You can set this up by configuring the action on the Content Plan Item object lifecycle.
The Update Tokens in Fields Content Plan action allows users to perform the action at the higher Content Plan level to update the tokens in up to 10,000 descendant Content Plan Items. The action is available for configuration on the Content Plan object lifecycle.
Create Document from a Template for Content Plan Items
You can configure the Create from Document user action on the Content Plan Item object lifecycle to generate documents from a document Controlled Document Template or another specified document. When users initiate this action, Vault creates a new document and automatically matches it to the corresponding Content Plan Item.
Create or Dispatch Global Content Plan
You can configure the Create Global Content Plan system action to allow users to create and update global content plans from an Event record in a specific lifecycle state. The Dispatch Global Content Plan user action can be configured in the Event object lifecycle to allow users to copy a Global Content Plan in bulk to local Submissions associated with the related Event’s Activity records. See Configuring Global Content Plans.
Additionally, you can configure the action in the Content Plan lifecycle to allow users to dispatch individual sections directly from the source content plan, as well as review and accept or reject the changes Vault will make to the target Submissions. You can also enable Dispatch Documents Only for the Dispatch Global Content Plan user action in the Content Plan lifecycle to ignore the target Submission structure and dispatch documents only. See Configuring Content Plan Synchronization.
You can configure the Dispatch Global Content Plan user action to Copy Relationships when they are not found on the target Submission. When this setting is disabled, the comparison intentionally excludes source Content Plan sections for relationships that don’t exist on the target Submission. A warning file logs the excluded source Content Plan sections when the Copy Relationships option is disabled or when the target Submission relationships has the Use for Content Planning field set to No.
Vault cannot dispatch a global content plan while a Split Content Plan Item, Copy into Content Plan (where the global content plan is the target content plan), Content Plan Hierarchy State Change, Update Content Plan, Update Content Plan Study Section, or another dispatch action is running in the same content plan.
Compare & Merge Content Plans
You can configure the Compare and Merge Content Plans user action to allow users to select two Submission Content Plans and run a comparison from the source Content Plan to the target Content Plan.
Users initiate this action from the menu of the target Submission record. The user selects the source Submission from which they wish to Compare and Merge from. If the target Content Plan doesn’t exist, it is created from its template first. If both Content Plans use the same template, the selected structure and documents are compared directly. If they use two different templates, Content Plan Item Template Mappings are used to map documents from the source Content Plan into the target Content Plan. The user can review the changes from the source Content Plan that are proposed to merge into the target Content Plan using the existing Comparison Viewer user interface. Changes are then committed to the target Content Plan based on the user’s selection at the time of comparison completion.
You can configure the Compare and Merge Content Plans user action to Copy Relationships when they are not found on the target Submission. When this setting is disabled, the comparison intentionally excludes source Content Plan sections for relationships that don’t exist on the target Submission. A warning file logs the excluded source Content Plan sections when the Copy Relationships option is disabled.
Note: When you regenerate a comparison, Vault deletes the existing comparison and creates a new one based on the latest source Content Plan and target Content Plan.
Merging & Publishing Content Plans & Items
You can configure your Vault to allow users to merge all matched documents within a content plan into a single merged PDF during the publishing process. To support authoring at a lower level of granularity, the merge functionality also allows users to merge multiple documents assigned to a single Content Plan Item into a merged PDF.
Content Plans
Submission Content Plans
The Merge and Publish Content Plan user action allows users to combine the PDF files matched within a submission content plan into a single merged PDF.
You can set this up by configuring the user action on the desired Content Plan lifecycle state, and by assigning the Merged PDF Document Number to the Submission object, its object types, and their page layouts.
Report Level Content Plans
To allow users to publish and merge report level content plans and items, you’ll need to configure a workflow with the Publish Documents and Create Submission Ready Binder system action and its related option, Merge PDF into a single PDF file.
See Configuring Report Level Publishing for configuration details.
Content Plan Items
When users match multiple Ready for Publishing documents to a Content Plan Item, they can set the Expected Steady State Count to the number of matched documents. During initial, on-demand, and continuous publishing, Vault merges the documents in their defined order and adds the documents as individual Source References to the merged and published Submissions Archive PDF document.
See also Merging & Publishing Content Plans & Items.
Creating Records as Inactive
When the Create Records as Inactive system action option is configured, Vault creates Content Plan and Content Plan Item records with an Inactive status, except for nodes where the Create as Active field is selected on the source Content Plan Item Template record.
To configure your Vault to create new records as Active or Inactive, complete the following:
- Add the Create as Active field to the object page layouts of the Content Plan Item Template object types Regional (Module 1), Nonclinical (Module 4), and Clinical (Module 5). The field is set as blank (false) by default, meaning that any records where the value remains blank will be created as Inactive when the content plan is created as inactive.
- Review your Vault’s Content Plan Item Template object type records listed in Step 1. Select the Create as Active checkbox on any records which Vault should create as Active when the Content Plan is created as inactive. We recommend records with a Node Type of Index-Leaf, Regional-Leaf, or STF-Leaf, as well as Cover Letter leafs.
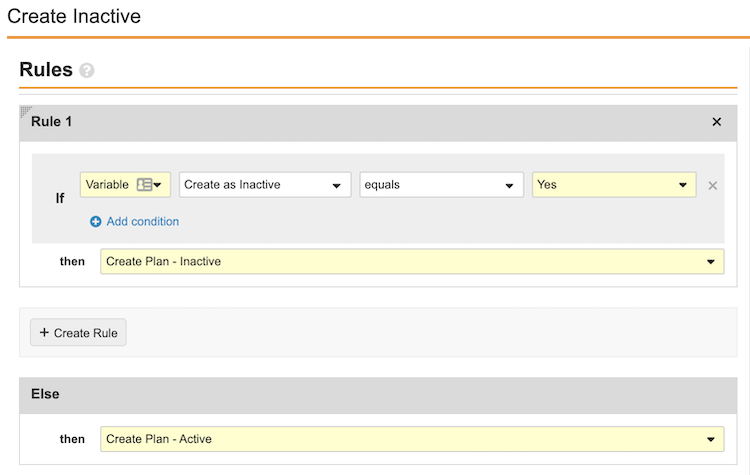
- Review your Vault’s Submission lifecycle workflows or lifecycle states where the Create Content Plan and Content Plan Items action is configured (for example, the Create Plan step within the Content Plan Creation Workflow). We recommend adding a workflow variable to allow the user to select whether the Content Plan should be created as inactive when starting the action. To do this:
- Define a Yes/No variable called, for example, “Create as Inactive”.
- Add the new “Create as Inactive” control to the workflow’s Start step under Start Options.
- Define a new System Action step for Vault to create the plan as inactive, for example, “Create Plan - Inactive”. Select the Create Content Plan and Content Plan Items System Action and the Create Records as Inactive checkbox.
- Optional: Relabel the existing Create Content Plan and Content Plan Items System Action step to indicate the plan will be created as active, for example, “Create Plan - Active”.
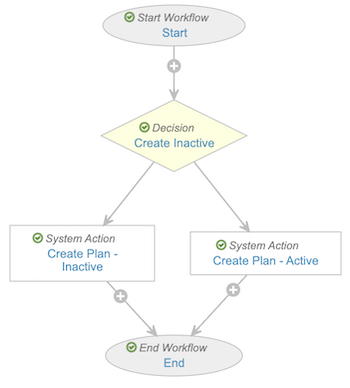
- Define a Decision Step between the Start step and System Action steps where Vault will create the plan as active (“Create Plan - Active”) or inactive (“Create Plan - Inactive”) based upon the newly-created variable. For example:
Updating Content Plan Study Sections
The Update Content Plan Study Section action is available for the Submission Clinical Study and Submission Nonclinical Study objects to move valid study sections related to a clinical or nonclinical study record within an eCTD content plan. The action moves the study section to the new location based on the updated Clinical Study Type (and Subtype) or Nonclinical Study Type (and Subtype) fields.
Users can perform the action for submission content plans only.
When configured, the action is available to users when:
- The Submission (Clinical or Nonclinical) Study record is Active, with both the (Clinical or Nonclinical) Study Type and (Clinical or Nonclinical) Study Subtype fields populated.
- The Submission record is Active, has an associated content plan populated in the Content Plan field, and Use for Content Planning is set to True.
Configuring the Update Content Plan Study Section Action
To allow users to update content plan study report sections:
- Activate the Update Content Plan Study Section action in the Submission Clinical Study and Submission Nonclinical Study objects.
- Within the Content Plan object lifecycle, add the Cascade Activation state type, then associate it with the Activate Section (Intermediate) state. This ensures any Inactive ascendant records are updated to Active when the target study section is moved.
- Also within the Content Plan object lifecycle, ensure the Inactive state includes a user action to change states to the Activate Section (Intermediate) state. This state change action may be labeled Change State to Draft, according to the recommended configuration for activating ascendant records.
- Review the permission set(s) assigned to the users who will be performing the action. For both the Submission Clinical Study and Submission Nonclinical Study objects, ensure the permission set includes View and Execute Object Action Permissions for the Update Content Plan Study Section action.