The Submissions Publishing application lets you prepare, finalize, and submit content within Vault in preparation for submitting content to a Health Authority. Content plans allow you to create a collection of documents when introducing a new product, or when changes occur on an existing product. You can then submit these documents to request approval to make changes to the product.
Note: This feature is only available on RIM Submissions Publishing Vaults.
How Submissions Publishing Works
When introducing a new product or making changes to an existing product that requires a submission, you can create or update a content plan with a collection of documents that represent the changes made to the product. Once the documents are ready for submission, the continuous publishing and validation process begins. Vault will detect new and updated documents in the Published lifecycle state and publish these documents. Users can then view the documents in the Submissions Archive Viewer and send the documents for review, prior to submission.
The continuous publishing and validation process ensures changes to the source content are monitored and the published output is updated to reflect changes, such as additional links or new versions. Vault validates each document, providing feedback to the publisher. Publishers can then correct issues prior to sending content for final review.
You can also create link annotations and cross-document permalinks between documents within a submission. During the continuous publishing phase, Vault converts the link annotations to relative hyperlinks within the published document.
Note: When exporting a published submission, Vault uses the Source File Path for each published document to construct the export’s folder hierarchy. The Source File Path is constructed based on the Parameter (parameter__v) value of the Dossier Type (dossier_type__v) field on the Submission, along with the Published Output Location of a given Content Plan Item. If the Parameter field contains a token for {application__v.folder_name__v}, the export uses the Application Folder Name (folder_name__v) field as the top level folder. As of 24R2, Vault prevents saving the Application object’s Application Folder Name field with the following special characters: / *
About Non-eCTD Submissions
Vault can publish and validate non-eCTD submissions when continuous publishing is enabled and the XML fields on the Submission record are set to N/A. When you set Enable Continuous Publishing to Yes, Vault:
- Publishes the submission content plan. Any Content Plan Items with the Node Type (
xml_node_type__v) field set to Index-leaf or Regional-leaf should be made inactive before enabling continuous publishing. - If the XML Element Name on a Content Plan Template is empty, the Name of the Content Plan Template record will be used as the XML Element Name when creating the Content Plan record. This is done by defaulting the XML Element Name field via configuration if your Vault does not currently have this default.
- Publishes the submission as non-eCTD, respecting the Dossier Format and its Parameter (when the DTD version is set to N/A), similar to importing a submission. See Defining the Submission Folder Hierarchy for more information on the parameter.
Creating & Publishing a Submission-Ready Dossier
To create a submission-ready dossier:
- Navigate to Applications > Submissions and create a new Submission record or edit an existing one.
- Fill in the Plan Template and Planned Submission Date fields. These field values determine which template to use when creating a Content Plan and the publishing priority for the submission.
- To set a default overlay for this Submission record, select Set Default Overlay from the Actions menu. Vault only applies this overlay when no Publishing Elements exist on a content plan item.
- From the Actions menu, choose Create Content Plan.
- Match documents to Content Plan Item records. Depending on your configuration, Vault may automatically match documents. If you match a CrossLink document to a content plan item, Vault publishes the CrossLink’s source document or viewable rendition based upon the Source for Published Document field value as a standard document during publishing.
- To allow Vault to generate a Table of Contents (TOC) document, open the appropriate Content Plan Item record and set the Node Type (
xml_node_type__v) field to Table of Contents. In the Publishing Element field, select the TOC template. Repeat this step for each TOC that you want to include in your content plan. - To allow Vault to apply an overlay to your matched documents, open the appropriate Content Plan Item record and set the Node Type field to Leaf. In the Publishing Element field, select the Publishing Element that defines the overlay.
- Create link annotations or dynamic links on your matched documents or Submissions Archive Content-type documents that were imported or published previously. During publishing, Vault gathers the link annotations from the documents and converts them to standard PDF links. Vault does not create links to any Submissions Archive Content documents that are currently being published. See also Working with Hyperlinks in RIM Submissions Publishing.
- Review the applicable Content Plan Item records. For non-eCTD submissions, update the Status field to Inactive for any records where the Node Type is set to Index-leaf or Regional-leaf. Otherwise, you can set the Continuous Publishing and Continuous Validation fields to Yes on all applicable Content Plan Item records. Enabling continuous publishing and validation allows Vault to monitor, publish, and validate the associated Content Plan as needed. You should only enable continuous publishing when you are ready to publish.
- Set your documents to Ready for Publishing.
- Navigate to the Submission record and set the Enable Continuous Publishing field to Yes. This publishes the Submission to Submissions Archive.
- Navigate to the Viewer tab to view your published output. Vault determines the submission dossier published output based on the Source for Published Document picklist.
Note: A published submission cannot be removed or reimported except when a published-in-Vault submission has one of the following Dossier Status values: Publishing Active, Transmission In Queue, Transmission In Progress, Transmission Failed, Transmission Successful.
In the Viewer tab, the Relative Filename section doesn’t appear in the published XML rendition for Study Tagging Files (STFs). This is caused by a defect in the stylesheet provided by the ICH.
Vault checks if the same Content Plan is used for multiple Submission records. If the Content Plan field on the Submission record is used by another Submission record, Vault prevents publishing from initiating and the user will receive an error message.
Publishing Details
Navigate to the Viewer tab to access your published documents and their details. From here, you can view an outline of all your documents that you set to Ready for Publishing. The Actions menu on each of your published documents provides various user actions for reviewing your content. Published document details are based on the following Content Plan Item fields:
- Published Output Location: This field defines the folder path and filename of where the published document will reside. Vault uses it to create standard PDF links with a relative path from Microsoft Word inter-document links and Vault link annotations.
- When editing this field, you must include the folder path in addition to the filename. For example, use
m1/1-2-cover/cover.pdfinstead ofcover.pdf. - Depending on your configuration, this field may already be populated and may not appear on your Content Plan Item page layouts.
- The Published Output Location field has a 100-character limit. If it exceeds the character limit, Vault cannot publish or publish/merge. Controlled characters (tabs and new-line) are automatically removed from the Published Output Location field upon publishing so the folder or file path remains valid.
- This value should be unique when publishing to the Submissions Archive Viewer, unless the same document has been matched multiple times to a Submission Content Plan. In this scenario, Vault duplicates the Published Output Location for all Content Plan Items with the same matched documents.
- When editing this field, you must include the folder path in addition to the filename. For example, use
- Published Document: Vault populates this field with a link to the published document based on the matched document. The published document is created from the matched document’s version at the time of publishing and always links to the latest version.
- Source for Published Document: This field defines the rendition or source document to be used as the published document. For example, if you specify Viewable Rendition as the source, Vault uses the viewable rendition of the matched document as the source to create the published document. Custom rendition types can be configured if needed. The source for the published document must correspond to the filename extension specified in the Published Output Location field. For example, if you specify Source Document as the source, and the matched document extension is .docx, the published output location filename should have .docx as the extension. In Vaults where a connection is configured, when you specify the source document as the Source for Published Document, Vault retrieves and publishes the file from the source Vault.
Note: When publishing Tables of Contents (TOCs), Vault currently applies the viewable rendition in all cases, regardless of the Source for Published Document value set within in-scope Content Plan Items.
These fields are defined by your Admin’s Content Plan Item Template configuration. However, based on your permissions, you can use inline editing to modify the Published Output Location and Source for Published Document fields from the Content Plan Hierarchy Viewer or edit them directly from a Content Plan Item record.
Document Fields
During publishing, Vault also copies some field values from source documents to published documents. Vault can copy values when fields with the same Name and field type exist on both the source document type and the Submissions Archive document type. Vault does not copy values to the Ready for Publishing field, document type fields, Application or Submission fields, archive fields, or any fields that the publishing process populates, such as Title.
Working with Published Content
After your submission content is finalized, various user actions in Vault support the submissions publishing flow.
The following options are available from the Actions menu for documents published from Content Plans:
- Open Content Plan: Opens the associated Content Plan for the published document.
- Open Content Plan Item: Open the associated Content Plan Item for the published document.
- Open Source Document: Opens the source document used to create the published document.
The following options are available from the Actions menu of Content Plan and Content Plan Item records:
- Open in Submissions Archive: Opens the submission in the Viewer tab from a content plan
- Open Published Document: Opens the published document
- Run On-Demand Validation: Runs the validation process
- Run On-Demand Publishing & Validation: Allows users to publish in the event that there is an issue that stops publishing from running
- Select Leaf Operation: Allows users to target a leaf from a prior submission of the same application from within an eCTD Content Plan
- Generate Publishing Table of Contents: Generates or recreates a Table of Contents (TOC) document from the template referenced on the related Publishing Element record and matches it to the Content Plan Item
Continuous Publishing
Continuous publishing improves the submission delivery process by incorporating publishing activities throughout content development. This process allows you to continuously publish documents as they become associated with a Content Plan and as updates occur on related content.
When continuous publishing is enabled, Vault:
- Creates the Submissions Archive-type binder and checks all matched documents to verify which ones are set to Ready for Publishing.
- Monitors the source documents for version changes and annotation updates such as new, modified, or deleted links.
- Publishes the documents to Submissions Archive based on the selected source document setting.
- Creates a Source References relationship between the source document and the published Submissions Archive document.
Continuous Publishing Prioritization
Vault automatically prioritizes continuous publishing jobs based on the value in the Planned Submission Date field on the Submission record. Continuous publishing jobs where the Planned Submission Date is in the next two (2) days will receive the highest priority.
Continuous Validation
Continuous validation provides the ability to verify an eCTD submission, based on the Health Authority acceptance criteria, during submission assembly in Vault. While validation typically occurs after fully publishing a document, continuous validation allows you to validate and make corrections during submission assembly and as content becomes available. This provides the necessary information regarding validation errors and warnings earlier in the process.
Setting Validation Conditions
Continuous validation conditions are dependent on a regional DTD/XSD version and a corresponding validation criteria version. The validation version determines which rules are applicable for the corresponding submission. You can set these conditions by specifying a regional DTD/XSD version in the Validation Criteria Version field on a Submission record. Note that your Admin determines the corresponding validation criteria for the specified regional DTD/XSD version.
Validation Process
Vault performs continuous validation when the Continuous Validation field is set to Yes on a Content Plan Item, and whenever the published document and/or related metadata is updated, including metadata affecting the published XML files.
Submission Validation Results
After performing validation, Vault creates a Submission Validation Result record for each validation criterion on each Content Plan Item. You can view these from the Submission Validation Results section on the Content Plan Item record details page. If you turn off Enable Continuous Publishing and then enable it again, Vault deletes and recreates all Submission Validation Results records. This allows you to update the validation conditions for a submission.
Vault also archives all Submission Validation Result records into a single XML file 365 days after the submission is complete so you can reference validation results without cluttering your Vault with unnecessary object records.
See Working with Submission Validation Results for complete details about validation results.
On-Demand Publishing & Validation
On-demand publishing allows you to publish documents after continuous publishing has been disabled or force publishing for a specific content plan section or item. In most cases, we recommend that you allow Vault to handle all publishing jobs via continuous publishing.
Using On-Demand Publishing & Validation
When you use the On-Demand Publishing & Validation action, Vault runs publishing and validation on any documents that contain hyperlinks to the published document. This allows Vault to keep all document links current throughout the on-demand publishing process.
Running on-demand publishing from the content plan’s root deletes all of the published output and recreates it. When started from the root, on-demand publishing publishes only Content Plan Items where the Continuous Publishing field is set to Yes. Starting on-demand publishing from a content plan item runs the publishing job on the related documents, regardless of the values in the Continuous Publishing and Continuous Validation fields on the record or the Ready for Publishing field on the document.
Link Publishing
During publishing, Vault compiles the link annotations and dynamic links within the document and converts them to standard PDF links with relative paths to the target documents, determined by the Published Output Location (xml_xlinkhref__v) field within the same submission and application.
See Working with Hyperlinks in RIM Submissions Publishing for more information.
Working with Tables of Contents (TOCs)
Publishing a Table of Contents
When you first publish a content plan, Vault automatically performs the following actions for any Content Plan Item records with the Node Type (xml_node_type__v) field set to Table of Contents:
- Generates and publishes a TOC document, using the related Publishing Element record to determine the TOC template. When applying the overlay, Vault currently only selects the viewable rendition, regardless of the Source for Published Document value.
- Classifies the TOC document based on the value in the Document Type Detail field on the Content Plan Item
- Sets the Ready for Publishing field to Yes on the TOC document
- Matches the TOC document to the Content Plan Item; if a document is already matched, Vault versions it
When the same source document in a Content Plan has been matched to multiple Content Plan Items, and each Content Plan Item has a unique Published Output Location value, the separate system-generated Table of Contents entries link to each document individually.
If a Table of Contents is placed at the top, in the middle, or at the bottom of a Content Plan section with Content Plan Items that are merged, Vault accurately reflects the overall page numbering of the Table of Contents on the top level Content Plan section row of the Table of Contents.
Note: When publishing and merging report level content plans, if the related Publishing Element record field Page Numbering is set to Overall Page Numbering, the TOC Template must be specified. Otherwise, the publishing job may fail.
During continuous publishing, on-demand publishing, or when you select the Generate Publishing Table of Contents action, Vault regenerates, versions, and, if continuous publishing is enabled, publishes the TOC document. Continuous publishing occurs any time a document referenced by the TOC document is published, versioned, matched to a Content Plan Item record, or when the Published Output Location, Publishing Element, or document metadata are updated.
Note: Continuous publishing will not update a published TOC if the document matched to the Content Plan Item for the TOC is unmatched, locked to a specific version, or deleted. You must run on-demand publishing to updated published output in these scenarios. When a TOC is locked to a specific version and an event causes it to be republished, Vault up-versions the system-generated matched document from its current state, but does not update the published document.
If you update the Node Type (xml_node_type__v) field on the Content Plan Item, Vault deletes or generates the TOC document accordingly. If you update the TOC template, you’ll need to use the Generate Publishing Table of Contents action to regenerate the TOC.
Note: When a Content Plan Item’s Node Type is set for a Table of Contents, do not manually match any documents to the item. Doing so results in failure to generate the TOC document.
Note: When there are more than 10,000 rows in the system generated Table of Contents, Publishing and Table of Contents generation fails. The user-facing exception CSV can be downloaded via the Publishing Status icon.
Editing a Table of Contents
You can update the elements that make up the TOC from the content plan viewer without editing any matched documents by using the Edit Table of Contents action.
When you execute the action from the content plan viewer or Content Plan Item Actions menu, Vault displays a hierarchical outline of the table of contents structure. The hierarchical outline shows the TOC’s Content Plan, Content Plan Item, and PDF bookmark components for viewing, filtering, and updating within the TOC editor.
Navigating the TOC Editor
By default, Vault displays all Active and Inactive TOC components. Click the Hide Inactive button to remove any Inactive components from the view, and Show Inactive to display them again. This action is useful for activating and inactivating items in bulk during your editing session.
You can Expand hierarchy items with child items below it by selecting the option from the item’s Actions menu. You can also filter and search within all displayed columns.
Editing the TOC
You can apply changes to hierarchy items through each item’s Actions menu. You can also use inline editing to modify an item’s name as it appears in the TOC. Some actions may be unavailable for the indicated TOC components.
- Select Activate to include or Inactivate to exclude an item from the generated and published TOC. You can also select Activate all below to perform the action on the item and all its descendants. Selecting Inactivate will automatically inactivate all items below it. Selecting Activate will automatically activate all inactive items in the parental hierarchy.
- Select Reset all below to remove edits from the item where you selected the action, in addition to any child items within the selected section. This action is not available for bookmarks.
- Select Include bookmarks to defined level within any item (except bookmarks) and enter the number for the Level at which to activate document bookmarks. All other bookmarks are inactivated. You can specify which level of bookmarks you want the Include bookmarks to defined level action to include in the Bookmark Level column.
- Select Include all to defined level from the root of the hierarchy and enter the number for the Level at which to activate items. All other items outside the level range are inactivated.
Reordering PDF Bookmarks
You can rearrange PDF bookmark TOC items using bookmark-specific actions.
When you Promote or Demote an item, Vault relocates it up or down one level in the hierarchy:
- Promote moves the item and its children to the left and up one level in the hierarchy, but in the same position.
- Demote moves the item and its children to the right and down one level in the hierarchy, but in the same position. This option is available only when there is a sibling directly above the item to be demoted.
When you select Move Up or Move Down, Vault relocates it above or below the adjacent TOC item:
- Move Up moves the item and its children above the item directly above it, within the same level in the hierarchy. Siblings directly above the item are unaffected.
- Move Down moves the item and its children below the item directly below it, within the same level in the hierarchy. Siblings directly below the item are unaffected.
Including Auto-Return PDF Bookmarks
You can include a bookmark that returns the reviewer from the TOC target PDF back to the published parent TOC.
To include auto-return PDF bookmarks, set the Return Bookmark to Yes on the Publishing Element record that is for the Table of Contents in your Content Plan. Vault automatically creates a return bookmark on target documents that are referenced in the system-generated TOC.
Return bookmarks will appear at the top of the bookmarks pane in the published PDF file, and assumes the name of the TOC’s Content Plan Item (edl_item__v.title__v).
Return bookmark limitations:
- Return bookmarks are only generated on published PDFs that have a Content Plan Item Source for Published Document field as Viewable Rendition
- If a publishing element has Return Bookmarks set to No and is changed to Yes, in order for the PDFs within a Content Plan to have return bookmarks generated you must run on-demand publishing on the parent of the Table of Contents
- Return bookmarks are not supported for RLCP publishing
- Auto-Return Bookmarks are not supported by eCTD 3.2 and 4.0
Ending the Editing Session
While the TOC is open for editing, Vault records overrides made during the editing session. When you conclude an editing session, Vault returns you to the viewer or Content Plan Item from which you launched the editor, then handles overrides based upon the option selected:
- When you select Close, Vault discards all changes made during the session.
- When you select Reset, Vault discards all changes made during this session and all other sessions, then generates and up-versions the TOC document. Following the update, Vault also triggers on-demand publishing to re-publish the TOC for Submissions in Submissions Publishing where continuous publishing is not enabled.
- When you select Generate, Vault applies all changes made during the session, then generates and up-versions the TOC document. If the TOC was previously published and its related Submission does not have continuous publishing enabled, Vault also triggers on-demand publishing to re-publish the TOC.
Overlay Publishing
When a PDF document is published as part of a submission content plan publish request, Vault applies the overlay defined in the content plan item’s Publishing Element record. If no Publishing Element exists on the content plan item, Vault applies the default overlay. If the Publishing Element exists but does not define an overlay, Vault does not apply an overlay.
You can also use the Source of Published Overlay picklist field on the Publishing Element record to populate Overlay token values based on Source Document values rather than Published document values. When merging published output, this resolves the Overlay tokens with different values per Source matched to the Content Plan Item(s). By default, if no Source of Published Overlay picklist is defined on the Publishing Element record, Vault assumes the overlay token values are taken from the Source matched document on the Content Plan Item.
To prevent unnecessary continuous publishing operations, Vault updates overlays on previously published documents only when you do one of the following:
- Update the Default Overlay field on the Submission record. This only re-publishes content plan items that don’t reference a Publishing Element.
- Update the Publishing Element field of a Content Plan Item record.
Updating the Overlay field on a Publishing Element record does not re-apply the overlay to previously published documents and only affects future documents. To apply the new overlay, you must re-publish the Content Plan Item using the On-Demand Publishing action.
eSignature Publishing
By default, Vault does not include eSignatures in published content plans. To include eSignatures, set the Content Plan Item object field Include eSignatures to Yes.
Note: Due to an application-specific limitation, RIM Publishing does not support signature page templates configured to populate eSignatures at the beginning of the document.
Selecting a Leaf Operation Target
You can use the Set Leaf Operation action to select a leaf node to lifecycle from a prior submission in the same Application (Replace, Delete, Append). If a document has been replaced more than once, only the current submitted version may be selected for additional lifecycle operations.
When a Content Plan Item record does not have an XML Operation field value, you can set the operation as New. Upon saving, Vault sets the record’s XML Operation value to New.
When you select the Delete operation, Vault sets the record’s XML Operation value to Delete upon saving, then clears the Published Output Location field during publishing. Vault also publishes a placeholder in Submissions Archive to indicate the lifecycle operation.
For any leaf with an XML Operation of Delete, Vault clears the Published Output Location upon publishing.
You can also Replace, Suspend (Delete), and Activate (New) documents previously submitted in both 3.2 and 4.0 formats, with appropriate handling of XML generation in the new submissionunit.xml. For Replace operations, users are able to select multiple previously submitted documents in a one:many or many:one relationship. Upon saving the Set Leaf Operation, Vault sets the XML Operation based on the value selected in the Set Leaf dialog and sets the eCTD 4 Modified Files field to the ID of the previously submitted document(s).
Vault supports the Set Reference Leaf action for both eCTD 3.2 and eCTD 4.0 submissions using the latest Submissions Archive APIs. The updated user interface aligns with the latest Submissions Archive Viewer experience and allows users to select previously submitted documents as Reference Leafs.
The Set Reference Leaf action only displays on a Content Plan Item where the following is true:
- the Disable Auto Reference Leaf field is enabled
- ICH DTD XSD Version is populated on the submission record to either ICH 3.2 or ICH 4.0
The Set Reference Leaf dialog defaults the Application filter to the current application. The Submission filter is blank by default.
While all previously submitted documents are displayed in the Set Reference Leaf dialog based on what is displayed in Submissions Archive, not all documents displayed are valid Reference Leaf candidates. If an invalid candidate is selected, an error message displays when you select Save.
Automatically Append STFs
Vault automatically evaluates Study Tagging Files (STFs) during Baselined lifecycle actions. When Vault identifies a previously submitted STF with the same StudyID within the same application, Vault automatically sets the XML Operation to Append and populates the XML Modified File Path.
Vault determines STF append eligibility using exact StudyID matching. If no prior STF exists with the same StudyID, Vault retains the XML Operation as New.
Vault only automatically appends STFs when the prior STF has an Actual Submitted Date (ASD) value or when the imported submission has a Dossier Status of Import Successful.
How to Select a Leaf Operation Target
- From the Content Plan Item’s Actions menu, select Set Leaf Operation. This opens a dialog to the current view of the application and section based on your current location within the Content Plan. This dialog is similar to the Submissions Archive Viewer tab and allows you to use filters to refine the list of submissions.
- In the Select Leaf Operation Target dialog, choose the desired XML Operation and leaf. Vault populates the selected leaf below the Leaf Operation Target heading in the dialog.
- Click Save.
- Vault populates the XML Modified File field with the selected leaf node. You can edit this field if necessary.
To undo a mistaken selection in an in-progress submission, repeat the above steps.
To view and lifecycle STFs, launch the Set Leaf Operation action from an STF node, or filter to a single Submission.
If multiple submissions for the same STF are in progress simultaneously and neither submission contains an ASD, Vault leaves both STFs as New until one submission is finalized. Users may need to manually correct XML Operations for earlier submissions finalized out of order.
Related Permissions
To allow users to set a leaf operation, your Vault’s permission sets and field security configuration must include the below.
Permission Set
Users must be assigned to a security profile containing a permission set with Read access to the following objects:
- Application
- Submission
- Content Plan
- Content Plan Item
- Submission Metadata
Field Permissions
Users must have Edit or Read access to the following Content Plan Item object fields:
- Primary Application
- Primary Submission
- XML Modified File
- XML Operation
- CTD Heading
- eCTD 4 Code Name
Optional Object Permissions
When a user opens the Set Leaf Operation dialog, Vault auto-expands the view to the documents they are most likely to choose, based on their object permissions.
Including Read and Edit access to the below objects in users’ permission sets allows Vault to be more precise when auto-expanding in all scenarios:
- Active Substance
- Clinical Study
- Country
- Inactive Ingredient
- Nonclinical Study
- Pharmaceutical Form
- Product
- Submission Clinical Study
- Submission Nonclinical Study
- Therapeutic Indication
Setting a Reference Leaf
A reference leaf is a file that has already been submitted but needs to appear in the XML backbone to indicate it is part of the current submission. You can use a previously-submitted and reviewed Submissions Archive document as a reference leaf, reducing the review time at the relevant Health Authority. Vault supports reference leafs to documents in previous submissions within the same application or to documents in separate applications with the same Lead Market.
For eCTD 4.0 submissions, Vault supports forward compatibility by allowing references to previously submitted eCTD 3.2 content. Vault generates documentReference values using the reserved ICH OID for forward compatibility and reuses existing metadata from the previously submitted document.
Vault only allows documents to be selected as Reference Leafs when the source submission has an Actual Submitted Date, is not Publishing Active, belongs to the same Health Authority and Division, and is not from the current submission.
Vault displays validation errors if users select invalid Reference Leafs including deleted or replaced documents, XML files, placeholders, Table of Contents nodes, documents from the same submission, or submissions using unsupported ICH DTD versions.
See Setting a Reference Leaf for detailed instructions.
Publishing Progress
Vault automatically updates the status indicator icon (or harvey ball) in the Publishing Status field to inform you if there are outstanding publishing or validation jobs as part of continuous publishing. This ensures that you only review and submit content after it has been published and validated.
You can see publishing status for the entire content plan, content plan sections, or individual content plan items. See Viewing Publishing Progress for details.
About the System User & Published Content Owner
Vault determines a published document’s Owner based on the Published Content Owner on the Content Plan’s related Submission record.
Additionally, Vault sets other roles on the published document based on roles assigned to the source document. If the Published Content Owner is assigned to other roles on the source document, those roles are added to the published document and assigned to the Published Content Owner. If the source document has other roles on it and there is no Published Content Owner on the Submission record, the users assigned to the roles on the source document are copied to the roles on the published document.
Example: Same Published Content Owner & Reviewer
If the Published Content Owner is set to Jane Doe, and Jane Doe is also the Reviewer on the source document, Jane Doe is added to both the Owner and Reviewer roles on the published document.
Example: Different Published Content Owner & Reviewer
If the Published Content Owner is set to Jane Doe, and John Smith is a Reviewer on the source document, Jane Doe is added to both the Owner and Reviewer roles on the published document.
Example: Blank Published Content Owner
If the Published Content Owner is not set and Jane Doe and John Smith are both Reviewers on the source document, Jane Doe and John Smith are Reviewers on the published document.
If you don’t select a user (the value is blank), Vault executes the submission publishing process as System User instead of the user who initiated the action.
To prevent job failures, users selected as the Published Content Owner must be licensed for the RIM Publishing application and be permitted to create documents of the Submissions Archive document type.
Reusing Documents
Vault automatically identifies documents within eCTD 4.0 submissions that have previously been submitted within the same Lead Market, Health Authority, and Health Authority division. When such a document is matched to a Content Plan Item, Vault automatically processes the document as a Reference Leaf by changing the Published Output Location to a relative path and setting the Node Type to Reference Leaf.
The Disable Automatic Reference Leaf field allows users to disable automatic reuse across specific Content Plan Items.
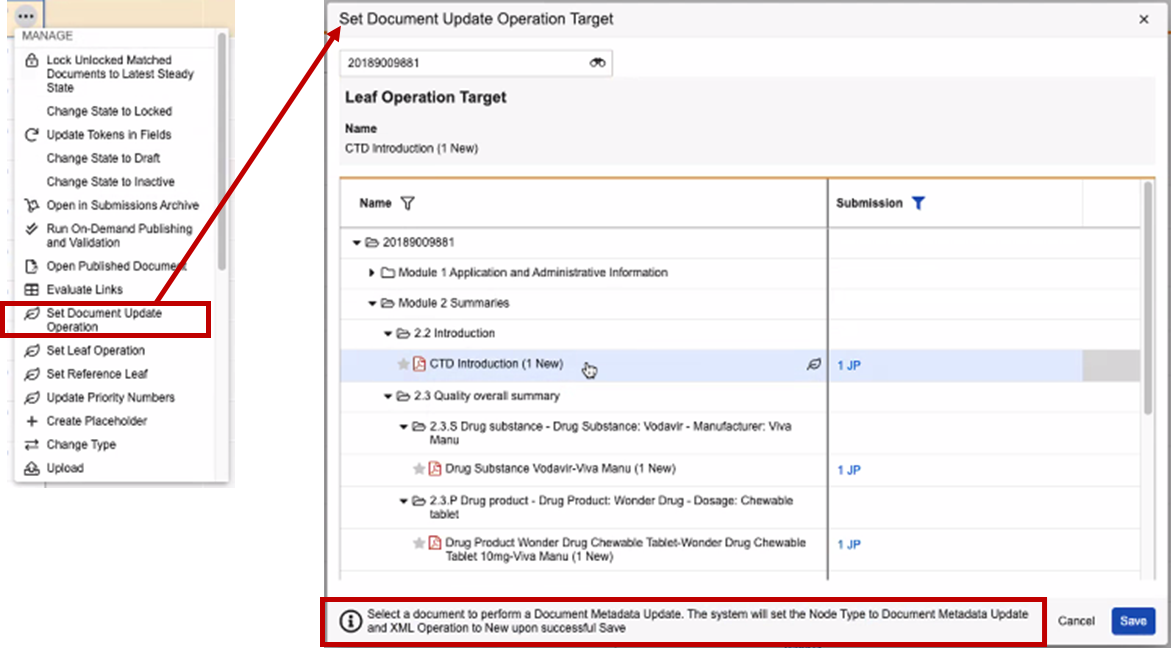
Setting a Document Update Operation
You can use the Set Document Update Operation to select a previously submitted document within the application and update that document’s Title. Vault sets the eCTD 4 Modified Files field to the ID of the previously submitted document and the Node Type to Document Metadata Update. The system will ignore any matched documents for Node Type Document Metadata Update.
Generating and Updating Priority Numbers
Users can set and define Priority Numbers for Context of Use (CoU) within eCTD 4.0 submissions. These actions allow for control over the display order of Context of Use/documents within Submissions Archive. When a submission is published, Vault automatically sets the Priority Number of each Context of Use to an increment of ‘32’. Within a Context Group, the Context of Use Priority Number increases by 32 for each new CoU added to the group.
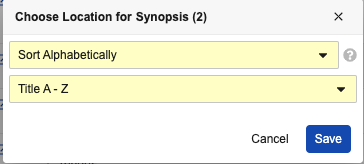
You can use the Update Priority Numbers action to change the display order of Context of Use (Content Plan Items) within a Context Group. The Update Priority Numbers dialog allows you to:
- Sort Alphabetically: Sort all Context of Use within the Context Group alphabetically by Title of filename of the document
- Move to Top: Move the current Context of Use to the top of the Context Group
- Move to Bottom: Move the current Context of Use to the bottom of the Context Group
- Move Below: Search for a specific Context of Use (by Title and sequence number) to move the current Context of Use below
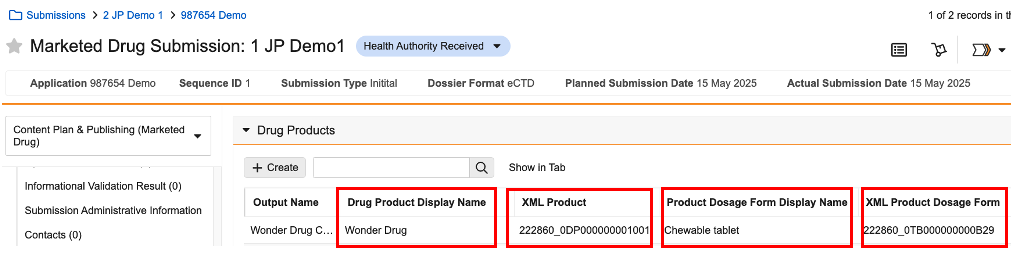
Managing Sender Defined Keywords
Sender Defined keywords on the submissionunit.xml pull from the
relevant submission__v object joins. Vault uses the submission joins to populate these relevant sender defined keywords.
| Keyword Type | Keyword |
|---|---|
| ich_keyword_type_1 | indication |
| ich_keyword_type_2 | substance |
| ich_keyword_type_3 | manufacturer |
| ich_keyword_type_4 | product |
| ich_keyword_type_5 | dosage form |
| ich_keyword_type_6 | excipient |
| ich_keyword_type_8 | study id_study title |