Creating an Event record is the recommended first step for many regulatory processes, as the records containing details pertaining to the event itself (such as the impacted product and its product variants, plus various types of packaging and their shelf life details) serve as the initial entry point for regulatory data that is eventually used across similar records for impacted markets via regulatory objectives and submissions.
The Create & Manage Event Details wizard provides a guided user interface for creating, updating, replacing, and withdrawing details in a few steps: Users can launch the wizard from an Event record, select one or more applicable changes (for example, adding new Drug Packaging details and withdrawing another), populate the required information, then review and confirm the results in a simplified view.
Along with the Create Related Records wizard for managing these details later in the process across impacted markets, bulk Event detail management greatly reduces repetitive data entry, increasing efficiency and enhancing data integrity.
Note: The Create & Manage Event Details wizard is only available for RIM Registrations and must be configured by an Admin.
About Creating & Managing Event Details
The Create & Manage Event Details wizard provides a streamlined UI for creating new or working with existing Event details records. This simultaneous approach allows you to work with selected records in a unified view, without including duplicates.
After an Event record is created in your Vault (either manually, or via the Quality-RIM Vault Connection), various Event lifecycle actions allow you to launch the wizard to process the various change types, then preview, refine, and confirm the proposed wizard output.
The objects and fields you see once you launch an action are based on Admin-defined configuration records and your user permissions.
Event Lifecycle Actions
Various actions configured in your Vault’s Event object lifecycle provide different methods for working with details records:
| Action Name | Action | Result |
|---|---|---|
| Create Event Details | Add, update, or withdraw existing and new Event details using the wizard. | Creates and updates records Transitions the Event to the In Review state Generates a preview file |
| Manage Event Details | Generate a preview of an Event with existing detail records, without adding any new ones. | Transitions the Event to the In Review state Generates a preview file |
| Review Event Details | Access existing preview files from an In Review Event record. | Vault loads the Review and Refine Event Details page |
| Clear Preview | Remove an existing preview file for an In Review Event record. | Deletes the file Reverts the Event to its previous state. |
Change Types
The wizard includes Add, Replace, Update, and Withdraw actions to streamline Event detail management activities, allowing you to complete one or many change types in a given session. The values you can select correspond to Admin-configured Related Change Types.
When processing a detail record, Vault sets its Related Change Type value accordingly.
| Change Type | Details | Related Change Type Values |
|---|---|---|
| Add | Allows you to create new records. | Add |
| Replace | A combination of adding and withdrawing, allowing you to replace existing values and records with new ones. | Add, Replaced By, Replacing, Withdraw |
| Update | Typically used when updating documentation for the Content Plan. Additionally useful for running an Impact Assessment Report to find relevant registrations, for example to find registrations eligible for renewal. | Update |
| Withdraw | Removes records and metadata via withdrawal workflows. | Withdraw |
Creating Event Details
To create Event details:
- Open the associated Event record.
- Select Create Event Details from the Actions menu.
- Select whether to Add, Replace, or Withdraw Event details.
- Select the Event detail for which you’d like to process a change from the Select change type dropdown. Selectable values for this and all subsequent fields are controlled by Admin-defined configuration records and your user permissions.
- Vault displays a simplified view of all relevant fields, records, or metadata options for the selected Event details, beginning with the Change field dropdown. Populate this and all other fields as required.
- Optional: Select Optional Relationships. In the resulting advanced mode dialog, select one or more Event relationships, click Apply, populate fields as required, then click Save. Repeat this step until all desired combinations are included.
- Optional: Select Add Change to include additional Event details, then repeat the applicable steps above.
- Once complete, select Generate Preview.
When you select Finish, Vault begins creating records according to your selections. Once complete, you’ll receive an email and Vault notification with a CSV file confirming the records Vault created or updated.
When you select Generate Preview, Vault:
- Initiates a job to create and gather the selected records and metadata. Once complete, you’ll receive an email and Vault notification with a link to preview them in Vault directly, as well as an attached CSV file summarizing the records included in the preview.
- Transitions the selected Event record to the In Data Review state, preventing all users from executing the Create Event Details or Manage Event Details actions.
See Reviewing & Refining Event Details for instructions on working with preview files and completing the Event detail creation process.
About Advanced Mode
Some events require different combinations of field values, for example associating multiple site roles to a Manufacturer, or multiple storage conditions to a Shelf Life or Condition.
When available, use the wizard’s Optional Relationships button to open the advanced mode dialog and populate the required values.
Managing & Reviewing Event Details
The Create Event Details and Manage Event Details actions can be executed in any configured Event lifecycle state (for example, Planned) by users with the appropriate permissions. While available states will vary according to your Vault’s configuration, these actions cannot be configured on the In Review state.
See Event Lifecycle Actions for more information, and Reviewing & Refining Event Details for details on working with preview files and completing the Event detail creation process.
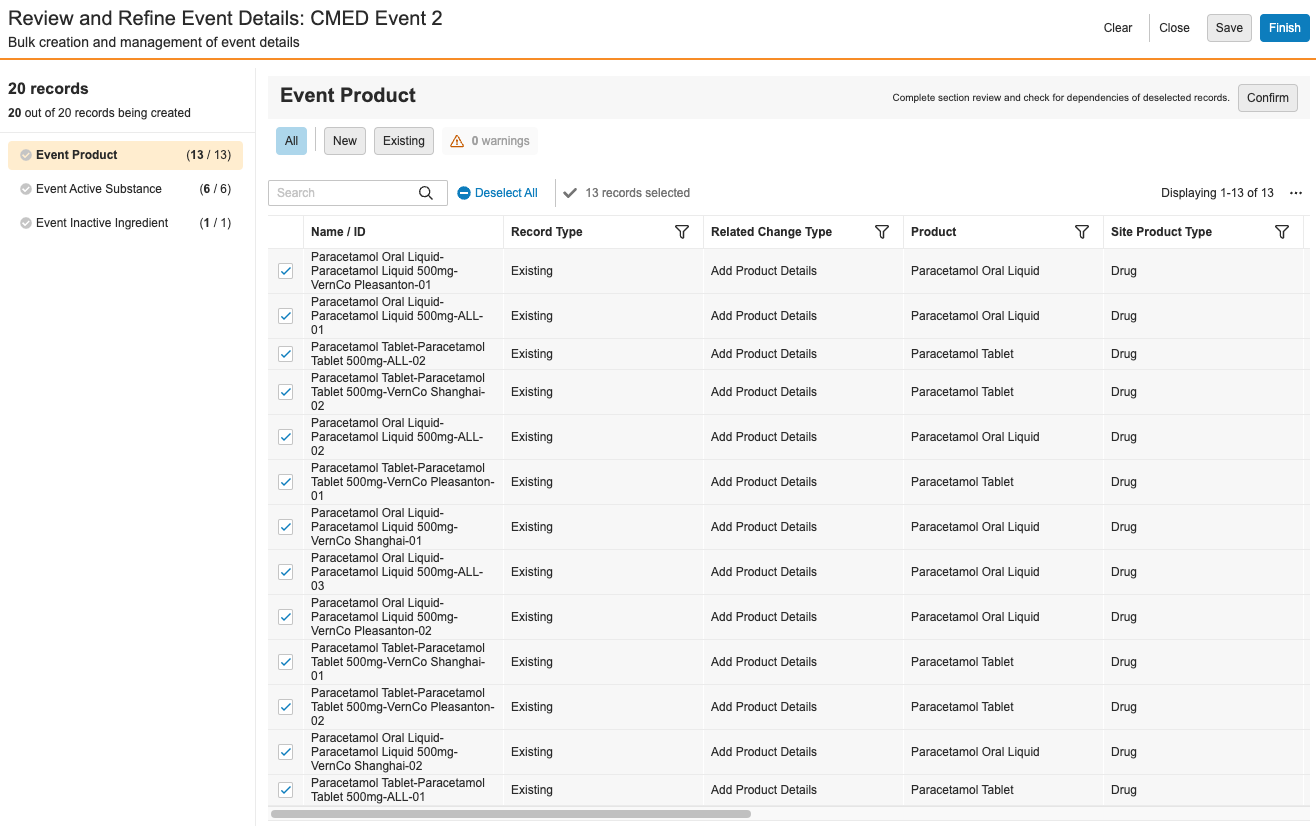
Reviewing & Refining Event Details
To review and refine Event details:
- Click the link in the email or Vault notification you received when creating the records or generating the preview. You can also select Review Event Details from the Actions menu of an Event in the In Data Review state.
- Vault displays the Review and Refine Event Details page. In the left-hand panel, select the Event details you’d like to review. Each Event relationship record appears with various icons denoting their status prior to your review and confirmation: records are active, records are inactive, and records with a indicate a dependency warning
- In the right-hand panel, use the various UI options to perform your review and make updates:
- Select the Actions menu, then Edit Columns adjust the columns you see in the wizard.
- At the top of the panel, click the button to quickly display only the records with dependency warnings, or click the All button to return to a listing of all records in the preview. You can also select New or Existing to quickly filter by records only by those Vault will create or update, respectively.
- Hover over individual cells you would like to edit. When a field is editable, the pencil icon appears and you can double-click to inline edit the value.
- To include a record, check the box to the left of the item, or uncheck the box to omit it. You can also click Select All or Deselect All to add or remove the selections for all records in that section.
- If you encounter incorrect records requiring updates, click the Clear button at the top of the screen to remove the preview file.
- If you cannot complete your review in a single session, click the Save button to save your selections.
- When you’ve refined the list to your requirements for a given related record type, click Confirm. In the event of dependency warnings, the Dependency Issues dialog appears, requiring you to click Continue to confirm such records will be created, or Cancel to return to the Review and Refine Event Details page.
- Repeat steps 2-4 until you’ve reviewed and confirmed the desired related record types. (The wizard does not require that you review and confirm all record types.) As you proceed through the list, Vault adds a green checkmark next to each record in the left-hand panel to indicate you’ve confirmed that selection, and that there have been no further changes to it since confirming.
- When your review is complete, select Finish to create the records that are still selected in the preview.
Vault begins creating records according to your review. Once complete, you’ll receive an email and Vault notification with a CSV file confirming the records Vault created or updated.
About Dependency Warnings
A record dependency warning indicates that the wizard will create independent records, or records without a reference to a related record.
For example, if an Event Inactive Ingredient record’s Event Product field is blank, Vault flags this with a dependency warning. If you do not populate the Event Product field, Vault creates or updates the Event Inactive Ingredient record with a blank Event Product field.
Saving Preview Files
When a given user is working in the wizard, Vault prevents all other users from generating a new preview file or working with the current one.
If you cannot complete your review in a single session, click the Save button at the top of the wizard’s Review and Refine Event Details page. Vault keeps your selections until you or another user return to it by running the Review Event Details action.
Clearing Preview Files
In the event a preview includes incorrect or missing data, you can remove it and generate a new preview file.
To do so, click Clear at the top of the wizard’s Review and Refine Event Details page, or select the Clear Preview action from an In Review Event record’s Actions menu.
Once cleared, the Event record returns to its previous lifecycle state and you can re-run the Create Event Details action.
About Content Planning
When an Event detail is used for Content Planning (according to its Use for Content Planning value), the wizard facilitates creating Event Inactive Ingredient and Event Clinical Study records so that they are appropriately filed within the corresponding Content Plan section.
When Use for Content Planning is set to “No”, or it is blank:
- For Event Inactive Ingredients, Vault does not populate the Event Product field.
- For Event Clinical Studies, Vault does not populate the Event Clinical Study field.
When Use for Content Planning is set to “Yes”:
- For Event Inactive Ingredients, the wizard populates new records with the first Event Product where Use for Content Planning is set to “Yes”. To do this, one of the following additional conditions must apply:
- The Inactive Ingredient is related to the Product Variant on the Event Product via the Product Variant-Inactive Ingredient relationship.
- The Inactive Ingredient is related to the Complex Product on the Event Product via the Product Variant-Inactive Ingredient relationship between the Inactive Ingredient and one of the Complex Product’s components.
- The Product on the Event Product is not complex, and Product Variant is blank.
- For Event Clinical Studies, the wizard populates new records with the first Event Indication record created by that change where Use for Content Planning is set to “Yes”.
Related Permissions
To execute any of the actions for the Event detail records described in this article you must be assigned:
- A role with Execute access in the relevant Event object lifecycle state(s).
- A permission set with Read, Create, and Edit access to the Event and any object you intend to directly or indirectly alter with the wizard.
About Preview File Permissions
The records available in a preview are based on the permissions of the user who generated it. If another user wishes to preview the file in full and confirm the changes, they must have these same permissions.
Otherwise, the previewing user:
- Cannot view object information for any objects to which they do not have access.
- Cannot confirm all details in the preview, and therefore cannot select the Finish button.
- Receives a Page Not Found error if they do not have access to the Event record. This page also appears if a preview has been cleared, or the preview URL is incorrect.
See Configuration for Bulk Creating & Managing Event Details for detailed permission requirements.