You can configure an Application Chronology multi-pass report that connects submissions, regulatory objectives, commitments, and correspondence documents to an application, all ordered by date. Your organization can use this report to see everything that has occurred for an application organized in chronological order. See Multi-Pass Reporting for detailed information about this type of report.
Note: This feature is only available on RIM Vaults.
Configuration Overview
The steps below outline the configuration required to set up an Application Chronology report:
- Configure custom reporting date formula fields on the Submission and Regulatory Objective objects.
- Configure necessary Report Types.
- Configure necessary Report Views.
- Configure the Multi-Pass Report Type for Application Chronology.
- Create the Application Chronology Report.
- Configure a Web Action for Application Chronology.
Configuring Reporting Date Fields
To provide a more comprehensive report, add custom formula fields to the Submission and Regulatory Objective objects to use a planned or targeted date when the actual or approval date is not populated.
Submission Reporting Date
To create the Reporting Date field on the Submission object:
- Navigate to Admin > Configuration > Objects > Submission > Fields and click Create.
- Select the Formula field type.
- Enter a Label, for example, Reporting Date.
- In the Return Type drop-down, select Date.
- Optional: Add the following Help Content: “When actual submission date is empty, formula displays the planned submission date for use in the Chronology Report.”
- Enter the following Formula Expression:
If(IsBlank(actual_submission_date__rim),planned_submission_date__rim,actual_submission_date__rim) - Click Save.
Next, add the field to all Submission object types and remove it from all object page layouts.
Regulatory Objective Reporting Date
To create the Reporting Date field on the Regulatory Objective object:
- Navigate to Admin > Configuration > Objects > Regulatory Objective > Fields and click Create.
- Select the Formula field type.
- Enter a Label, for example, Reporting Date.
- In the Return Type drop-down, select Date.
- Optional: Add the following Help Content: “When actual approval date is empty, formula displays the target approval date for use in the Chronology Report.”
- Enter the following Formula Expression:
If(IsBlank(actual_approval_date__rim),target_approval_date__rim,actual_approval_date__rim) - Click Save.
Next, add the field to all Regulatory Objective object types and remove it from all object page layouts.
Creating Report Types
Navigate to Admin > Configuration > Report Types and create or update the following report types:
- Date: Ensure the Date report type is set to Active.
- Submission: Create a Submission report type if one does not already exist, with Submission as the primary reporting object.
- Regulatory Objective: Create a Regulatory Objective report type if one does not already exist, with Regulatory Objective as the primary reporting object.
- Commitment: Create a Commitment report type if one does not already exist, with Commitment as the primary reporting object.
Creating Report Views
Navigate to Admin > Configuration > Report Views to create the necessary report views.
Basic Report Views
Create the following basic report views based on the report types you created:
- Date: Create a Date report view for the Date report type you enabled.
- Submission: Create a Submission report view for the Submission report type you created.
- Regulatory Objective: Create a Regulatory Objective report view for the Regulatory Objective report type you created.
- Commitment: Create a Commitment report view for the Commitment report type you created.
Do not configure filters while setting up these report views. You will add filters and columns when creating the Application Chronology report itself.
Regulatory Correspondence Report View
To create a Regulatory Correspondence report view:
- From the Report Views page, click Create.
- In the Report Type menu, select Document.
- Set the Type to Regulatory and the Subtype to Correspondence.
- Enter a Name, for example, Regulatory Correspondence.
- Click Continue.
- Add a filter for Correspondence Date is not blank.
- Click Save.
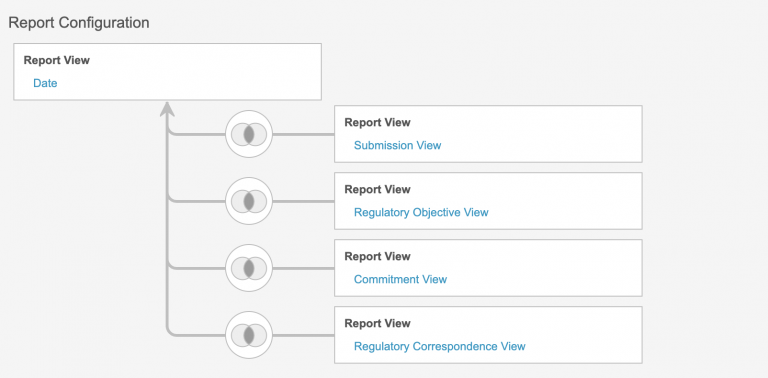
Configuring the Application Chronology Multi-Pass Report Type
Next, create an Application Chronology report type as a multi-pass report. The Date report view will always need to be the primary reporting object, but the order of the other report views can differ. You can also adjust the order within the report itself.
- Navigate to Admin > Configuration > Report Types and click Create.
- Enter a Label, for example, Application Chronology.
- In the Class field, select Multi-Pass.
- In the Report Configuration section, select the Date view as the Reporting Entity.
- Click Add Relationship to add a relationship to the Submission report view and populate the fields:
- In the Select new entity field, select Submission.
- In the Match Date on field, select Date > Date.
- In the Match new entity on field, select Submission > Reporting Date.
- In the Join type field, select Inner.
- Click Add.
- Click Add Relationship to add a relationship to the Regulatory Objective report view:
- In the Select new entity field, select Regulatory Objective.
- In the Match Date on field, select Date > Date.
- In the Match new entity on field, select Regulatory Objective > Reporting Date.
- In the Join type field, select Inner.
- Click Add.
- Click Add Relationship to add a relationship to the Commitment report view:
- In the Select new entity field, select Commitment.
- In the Match Date on field, select Date > Date.
- In the Match new entity on field, select Commitment > Commitment Due Date.
- In the Join type field, select Inner.
- Click Add.
- Click Add Relationship to add a relationship to the Regulatory Correspondence report view:
- In the Select new entity field, select Regulatory Correspondence.
- In the Match Date on field, select Date > Date.
- In the Match new entity on field, select Document > Correspondence Date.
- In the Join type field, select Inner.
- Click Add.
- On the Create Report Type page, click Save. Your report configuration will look like this.
Creating the Application Chronology Report
After you configure the Application Chronology report type, you can create the report itself:
- Navigate to the Reports tab and click Create.
- In the Report Type menu, expand the Date type and select Application Chronology.
- Optional: Enter a Name and Description.
- Click Continue.
- Add prompts, filters, and groupings.
- Configure any columns you want to display.
When you’ve finished adding all filters, prompts, groupings, and columns, click Save to save the report.
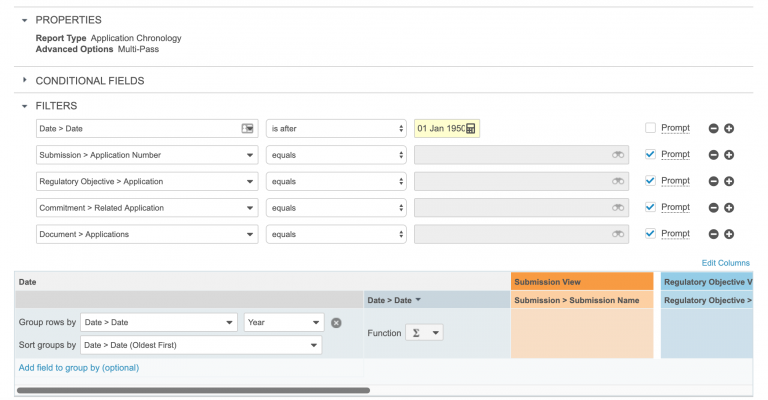
Adding Prompts, Filters & Groupings
We recommend adding the following filters, prompts, and groupings:
- Add a Date filter: Date > Date is after “01 Jan 1950”. The date you select should approximate the oldest date on which your organization has any related documents or records.
- Add the following filters and select the Prompt checkbox for each:
- Submission > Application Number equals
- Regulatory Objective > Application equals
- Commitment > Related Application equals
- Document > Applications equals
- Add the following grouping:
- In the Group rows by drop-down, select Date > Date. In the Select period drop-down, choose Year.
- In the Sort groups by drop-down, select Date > Date (Newest First).
- Click the Date > Date column header so that the sort arrow is pointing down.
Setting Up Columns
Click Edit Columns to add the columns you need. We recommend adding the following columns:
- Date > Date
- Submission > Submission Name
- Submission > Lifecycle State
- Regulatory Objective > Name
- Regulatory Objective > Lifecycle State
- Commitment > Name
- Commitment > Lifecycle State
- Document > Document Name
- Document > Document Status
Configuring the Web Action
After you save your report, we recommend configuring a web action to allow users to launch the report. Configuring a web action will prevent users from needing to fill in repetitive report prompts. Follow the steps in the sections below to configure the web action.
Running the Report
First, run the Application Chronology report you created:
- Navigate to the Reports table and select Application Chronology report you created.
- In the Select Report Values dialog, complete the report prompts.
- Click Continue.
- Copy the generated report’s URL.
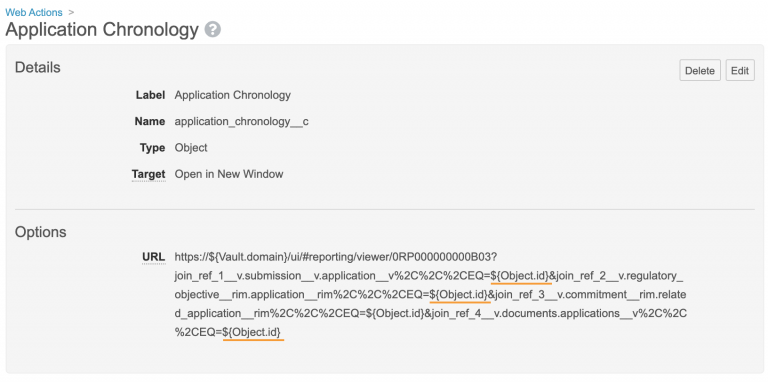
Creating the Web Action
Next, you can create the web action using the report’s URL. Note that you cannot simply copy and paste the URL. You’ll need to replace certain elements of the URL with different parameters.
To create the web action:
- Navigate to Admin > Configuration > Web Actions and click Create.
- Enter a Label, for example, Application Chronology.
- In the Type drop-down, select Object.
- Select a Target from the drop-down. We recommend setting this to Open in New Window.
- In the URL box, enter the copied URL.
- Edit the URL you entered to replace the domain with the
${Vault.domain}parameter and each of the 00A record IDs with the${Object.id}parameter. - Click Save.
Configuring the User Action
Finally, you can configure the web action as a user action on the Application object lifecycle. If your Vault doesn’t already include an Application lifecycle, you’ll need to create one first. We recommend adding this action on the Active state. If needed, you can add additional security on the action to only make it available to certain users.